REST API
An important part of the Doc Gen solution is the opportunity to integrate through other solutions. Doc Gen offers both webhooks and REST API for integrations. Security is an important part of this solution. Doc Gen is useing oAuth 2.0 with the possibility to add MTLS for extra security. Key management is still important at customer level. Meaning that keys must be stored and protected in a good way.
The rest API can also be used within the Workflow solution if the build in features isn’t sufficient.
These are the APIs available :
| Solution | Link |
|---|---|
| Smartforms | Doxis - Studio |
| Signature | Doxis - Digital Signing |
| Archive | Doxis - Archive |
| Pages v3 | Doxis - webeditor |
| Pages v4 | Doxis - webeditor-v4 |
| Viewpoint | Doxis - Viewpoint |
| Audit | Doxis - Audit |
Authentication
Doc Gen is using oAuth 2.0 for authentication. In order to get this to work you need to register a Client id and Client secret in Doc Gen that you will be using to establish a Bearer security token. There is also the possibility to register a certificate thumbprint and authenticate using mTLS.
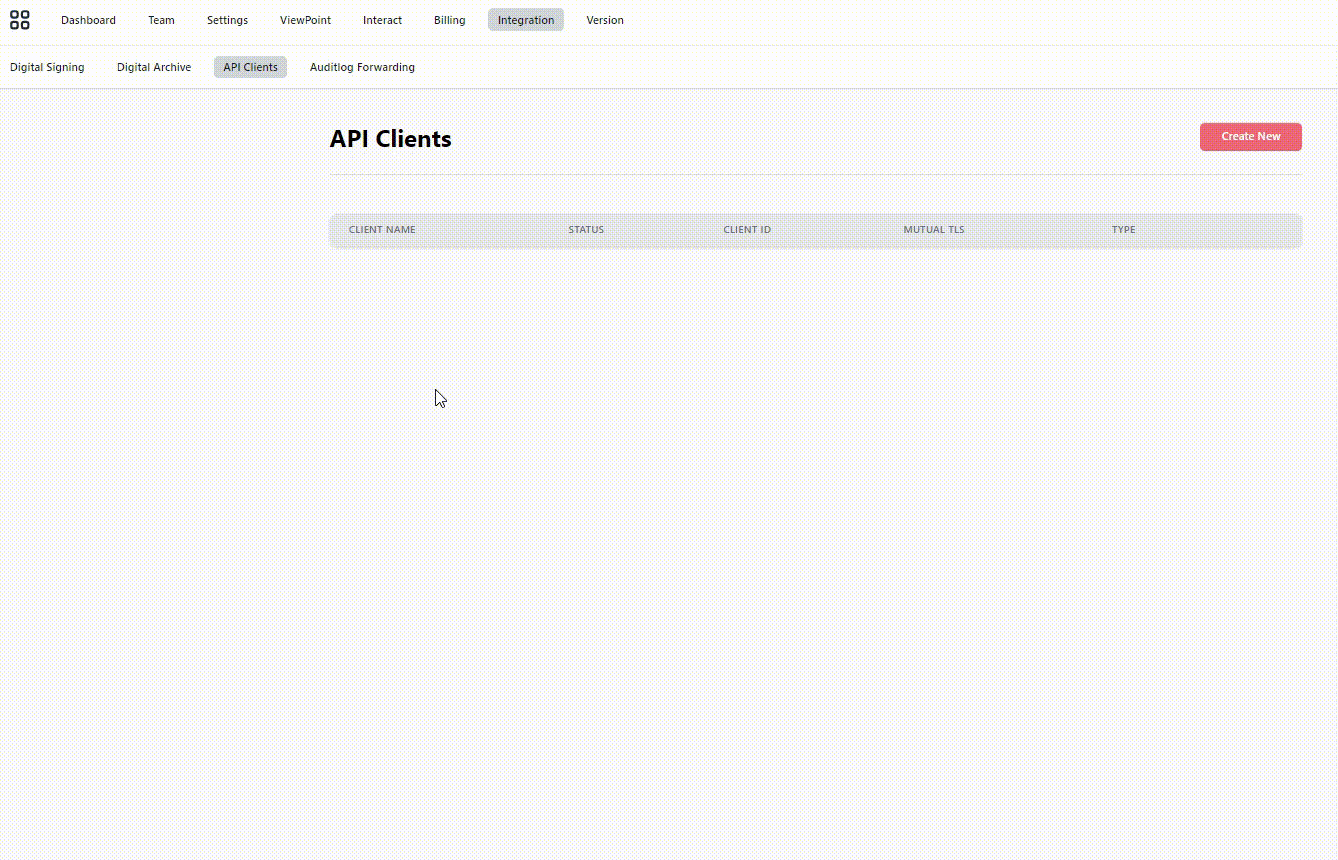
By opening up the admin application in Doc Gen you have a menu called API Clients under Integration. This allows you to create a client id and client secret pair (or enter a certificate thumbprint for mTLS) that you will be using when authenticating the REST API calls.
Postman
Postman is a well known tool for testing out a REST API. We are referring to this tool when we explain how the REST API work in Doc Gen.
Authorization
All API calls will need an authorization to be done in order to access the various API calls availeable. We assume that you have registered a client id / Client secret pair in Doc Gen admin and have the two strings available.
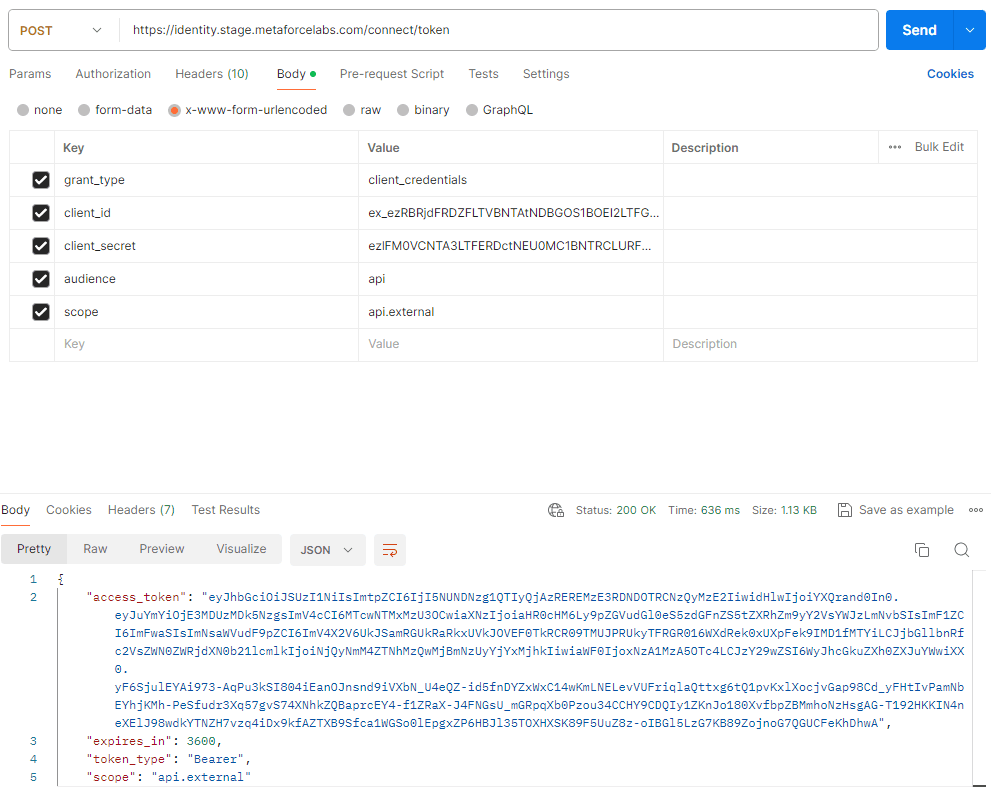
Postman
This example shows how you can make an authentication in Postman and getting a Bearer access token back. By filling out the Body shown in the example (remember it is a POST), you will be able to create the Bearer token. This token will be used in the next step when running the actual API’s.
Javascript
This javascript demonstrates how you can use client id and client secret to establish a Bearer token for futher API calls with Doc Gen.
const axios = require('axios').default;

async function main(args) {

    var client_id = 'ex_e0JBQ0I3NTQyLUE1NzgtNDI0Nixxxxxxxxxxxxxxxxxxxxx';
    var client_secret = 'ezMzMjA2MTU5LTRGNTktNDM5Mi0xxxxxxxxxxxxxxxxxxx';

    var scope = 'api.external';
    var authHeader = 'Basic ' + Buffer.from(client_id + ':' + client_secret).toString('base64');
    const tokenOptions = {
        method: 'POST',
        url: 'https://identity.stage.metaforcelabs.com/connect/token',
        headers: { 'content-type': 'application/x-www-form-urlencoded', 'Authorization': authHeader },
        data: 'grant_type=client_credentials&scope=' + scope
    };

    try {
        var tokenResponse = await axios.request(tokenOptions);
        const accessToken = tokenResponse.data.access_token;

        // Set the Authorization header for subsequent requests
        axios.defaults.headers.common['Authorization'] = `Bearer ${accessToken}`;

    } catch (error) {
        console.error('Error:', error.message);
    }
      var newBody = [];

    return { body : newBody}
}
main();
Smartform Examples
All fields in a Smartform has a property name. These names are used when trying to insert or read data from a Smartform.
A Smartform is identified with a dialogDefinitionId. This Id can be obtained in the URL like is shown in the example below.
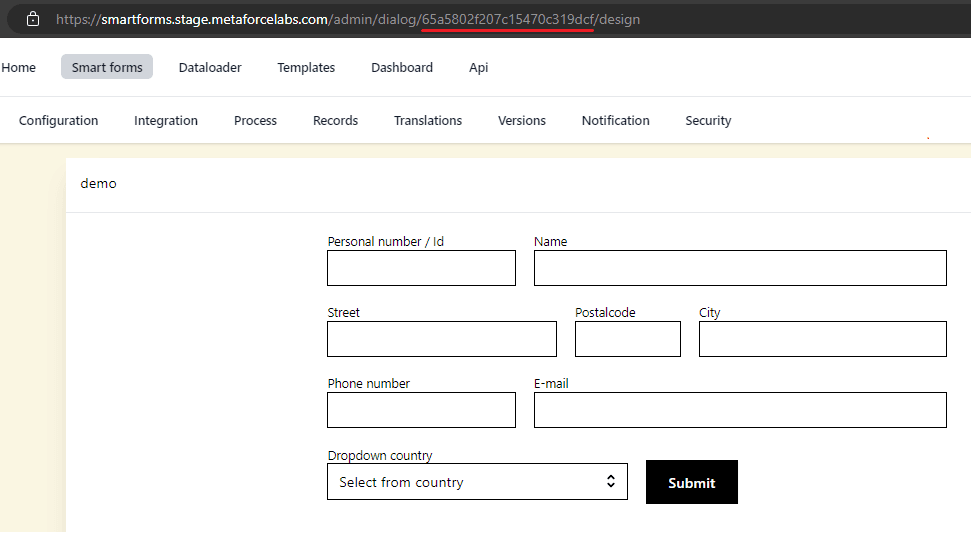
When you create a instance of a Smartform that you would like to send to somebody or link to a MyPage you will need the dialogDefintionId as shown below. The example also shows hos the Smartform element with property iName is filled out under the values section.
The response contains a unique id for the specific instance of the Smartform that was created.
By inserting DialogId and Id into this URL you can check the result.
URL template: https://smartforms.metaforce.net/dialog/<dialogId>/form/<formid>
Prefilled values
This example shows how you can create a smartform from a Javascript with some prefilled values ; name, age, city and country:
const axios = require('axios').default;

async function main(args) {
    var client_id = 'ex_e0JBQ0I3NTQyLUE1NzgtNDI0Ni05Oxxxxxxxxxxxxxxxxxxx';
    var client_secret = 'ezMzMjA2MTU5LTRGNTktNDM5Mi04Mxxxxxxxxxxxxxxxxxx';
    var idDialogId = '646f4127f70bcxxxxxxxxxxx';

    var scope = 'api.external';
    var authHeader = 'Basic ' + new Buffer(client_id + ':' + client_secret).toString('base64');
    const options =
    {
        method: 'POST',
        url: 'https://identity.stage.metaforcelabs.com/connect/token',
        headers: { 'content-type': 'application/x-www-form-urlencoded', 'Authorization': authHeader },
        data: 'grant_type=client_credentials&scope=' + scope
    };

    try {
        var response = await axios.request(options);
        axios.defaults.headers.common['Authorization'] = `Bearer ${response.data.access_token}`;

        const request =
            {
                method: 'POST',
                url: 'https://api.smartforms.stage.metaforcelabs.com/Integrations/dialog/json',
                headers: { 'content-type': 'application/json' },
                data: {
                    dialogDefinitionId: idDialogId,
                    values:
                    {
                         'name' : 'John',
                         'age' : '39',
                         'city' : 'Stockholm',
                         'country' : 'Sweden'
                    }
                }
            };

            const res = await axios(request);

        var newBody = [];
        return { body: newBody }
    } catch (err) {
        console.log(err)
    }
}

module.exports.main = main;
Bitmaps
This example shows how you can insert a Bitmap and maybe change it based on various logic. The script will return the URL to the Smartform created.
const axios = require('axios').default;

async function main(args) {
    var client_id = 'ex_ezY5QjM4MDZELTdERkUtNDdGNCxxxxxxxxxxxxxx';
    var client_secret = 'ezYxQkMxNTA2LUI0RTAtNDFGQy04Mxxxxxxxxxxxxxx';

    var idDialogId =  '64aea6aad36xxxxxxxxxxxx';

    var scope = 'api.external';
    var authHeader = 'Basic ' + new Buffer(client_id + ':' + client_secret).toString('base64');
    const options =
    {
        method: 'POST',
        url: 'https://identity-v2.metaforce.net/connect/token',
        headers: { 'content-type': 'application/x-www-form-urlencoded', 'Authorization': authHeader },
        data: 'grant_type=client_credentials&scope=' + scope
    };


        var response = await axios.request(options);
        axios.defaults.headers.common['Authorization'] = `Bearer ${response.data.access_token}`;

    var inp_insured = 'Johan Ohlsson';
    var inp_claimnumber = 'LP27394829';


    const logo1 = "iVBORw0KGgoAAAANSUhEUgAAASwAAAEoCAMAAADVMjxRAAAB/lBMVEUAAAAAjtUAjtUAjtUAjtUAjtUAjtUAjtUAjtUAjtUAjtUAjtUAjtUAjtUAjtUAjtUAjtUAjtUAjtUAjtUAjtUAjtUAjtUAjtUAjtUAjtUAjtUAjtUAjtUAjtUAjtUAjtUAjtUAjtUAjtUAjtUAjt";
    const logo2 = "iVBORw0KGgoAAAANSUhEUgAAAAUAAAAFCAYAAACNbyblAAAAHElEQVQI12P4//8/w38GIAXDIBKE0DHxgljNBAAO9TXL0Y4OHwAAAABJRU5ErkJggg==";

    var bitmap = logo1;

    const request =
    {
        method: 'POST',
        url: 'https://api.smartforms.metaforce.net/Integrations/dialog/json',
        headers: { 'content-type': 'application/json' },
        data:
        {
            dialogDefinitionId: idDialogId,
            values:
            {
                'Insured' : inp_insured,
                'claimnumber' : inp_claimnumber,
                'bmpLogo' : bitmap
            }
        }
    };
    const res = await axios(request);
    var url = 'https://smartforms.metaforce.net/dialog/' + res.data.dialogDefinitionId + '/form/' + res.data.id
    return { body: url }
}

module.exports.main = main;
External data
A Smartform can handle external data. These variables have some different purposes.
ExternalMetaData
Will follow the Smartform and will help a system integrator to connect the Smartform result to a instance in another system. An example is that a Smartform is created from a Case in a CRM system. The case has a reference number and will be available in the Payload the whle time and will help the programmer to connect the Smartform with status to the referenced case.
"externalMetaData": {
    "CRM_Key": "918203981203",
    "Case_Key": "0209384028340"
  }
dataTableValue
dataTableValues are external data that can be used within a Smartform without beeing directly connected to a field. dataTableValues are used by adding [[ dataTableField ]] in a smartform. The field within the brackets are then marked blue to identify that this is external data.
    "dataTableValue": {
        "ext1": "Leading the paperless revolution",
        "ext2": "test 1",
        "ext3": "test 2"
    }
Example
This example body contains both ExternalMetaData and dataTableValue.
{
    "dialogDefinitionId": "64e4a31fdf775xxxxxxxxxxxx",
    "notification":
    {
        "sendSms": true,
        "sendEmail": true,
        "participatingParties":
        [
            {
                "id": "Reciever",
                "name": "Peter",
                "email": "xxxxxxxxxl@doxis.se",
                "phone": "+46999999999999"
            }
        ]
    },
    "dataTableValue": {
        "ext1": "Leading the paperless revolution",
        "ext2": "test 1",
        "ext3": "test 2"
    },

    "externalMetaData": {
    "CRM_Key": "918203981203",
    "Case_Key": "0209384028340"
  },
    "values" :
    {
        "Headline":"Doxis",
        "List1":"V1",
        "drp1" : "V3"
    }
}
Participating parties
This is an example that establish a Bearer Token. The code is tested under Digital Ocean and will create a Bearer Token for further use. Make sure you register a client key in Doc Gen and then paste the values into client_id and client_secret in the javascript.
const axios = require('axios').default;

async function main(args) {
    var client_id = 'ex_e0JBQ0I3NTQyLUE1NzgtNDI0Nixxxxxxxxxxxxxxxx';
    var client_secret = 'ezMzMjA2MTU5LTRGNTktNDM5Mixxxxxxxxxxxxxxxx';
    var idDialogId = '646f3df4f70bcab31bsssssssss';

    var scope = 'api.external';
    var authHeader = 'Basic ' + Buffer.from(client_id + ':' + client_secret).toString('base64');

    const tokenOptions = {
        method: 'POST',
        url: 'https://identity.stage.metaforcelabs.com/connect/token',
        headers: { 'content-type': 'application/x-www-form-urlencoded', 'Authorization': authHeader },
        data: 'grant_type=client_credentials&scope=' + scope
    };

    try {
        var tokenResponse = await axios.request(tokenOptions);
        const accessToken = tokenResponse.data.access_token;

        // Set the Authorization header for subsequent requests
        axios.defaults.headers.common['Authorization'] = `Bearer ${accessToken}`;

       // Define e-mail adresses to be used in Smartform process
        var email1 = "1@doxis.com"
        var email2 = "2@doxis.com"
        var email3 = "3@doxis.com"
        var email4 = "4@doxis.com"

        // Define the body for creating a smartform
        const SmartformBody = {
            "dialogDefinitionId": idDialogId,
            "notification": {
                "sendSms": false,  // will not notify through SMS
                "sendEmail": true, // will notify through e-mail
                "participatingParties": [
                    {
                        "id": "64e32174546c402e32313f32",  // Useing party Id or actual party role name
                        "name": "ONE",
                        "email": "1@doxis.com",
                        "phone": "+4747682050"
                    },
                    {
                        "id": "64e32174546c402e32313f33",
                        "name": "TWO",
                        "email": "2@doxis.com",
                        "phone": "+4747682050"
                    },
                    {
                        "id": "64e32199546c402e32313fb7",
                        "name": "THREE",
                        "email": "3@doxis.com",
                        "phone": "+4747682050"
                    },
                    {
                        "id": "64e36028ed6e2a8ccbdbc46d",
                        "name": "FOUR",
                        "email": "4@doxis.com",
                        "phone": "+4747682050"
                    }
                ]
            },
            "values": {
                "Headline": "Dette er en test",
                // ... other values
            }
        };

          const postOptions = {
            method: 'POST',
            url: 'https://api.smartforms.smartforms.metaforce.net/Integrations/dialog/json',
            headers: { 'Content-Type': 'application/json' },
            data: SmartformBody
        };

        var postResponse = await axios.request(postOptions);
        await new Promise(resolve => setTimeout(resolve, 2));


    } catch (error) {
        console.error('Error:', error.message);
    }
      var newBody = [];

      return { body : newBody}
}

main();
Web Editor Examples
WebEditor has a REST API that allows for documents to be edited or send directly for PDF production. These features requires Doxis Interact to be installed.
Base64
WebEditor will need document metadata to be in a Base64 string. There are online tools that will help you doing this (search the internet for Base64 XML) or you could write a small function that will do it for you.
This function is for Digital Ocean and will transform JSON input to a valid WebEditor XML before it is transformed into Base64:
const json2xml = require("json2xml")
const axios = require("axios")

async function main(args)
{
  console.log(args);

      // keep this need to delete fro json body
      delete args.http
      delete args.__ow_headers
      delete args.__ow_path
      delete args.__ow_method
      // keep this need to delete fro json body

      Object.keys(args).forEach(k => !args[k] && delete args[k])

      const xmlver = "<?xml version='1.0' encoding='utf-8'?>"

      const xmlData = xmlver + "<Data>" + json2xml(args) + "</Data>";
      const base64Data = Buffer.from(xmlData).toString('base64');

    return {"body": base64Data }
}

exports.main=main
XML Sample data
You will need to construct some XML data with input elements that are used in the Interact template. This is one example:
<?xml version='1.0' encoding='utf-8'?>
<Data>
    <Contact
        ContactAccountId="0012o00002OkJbTAAV"
        ContactAccountName__c="Dickenson plc"
        ContactAssistantName="Marie Curie"
        ContactAssistantPhone="(785) 265-5350"
        ContactBirthdate="2000-09-20"
        ContactCleanStatus="Pending"
        ContactCount__c="123"
        ContactDepartment="Internal Operations"
        ContactDescription="(785) 265-5350"
        ContactDoNotCall="false"
        ContactEmail="a_young@dickenson.com"
        ContactFax="1234567"
        ContactFirstName="Andy"
        ContactHasOptedOutOfEmail="false"
        ContactHasOptedOutOfFax="false"
        ContactHomePhone="(524) 232.2123"
        ContactId="0032o00002WtQjkAAF"
        ContactIsEmailBounced="false"
    />
</Data>
Once you have managed to create a XML and converted it to Base64 you are ready to use the API to create documents
DXML
If you would like to create a document that can be edited, you will need to create a DXML. When creating a DXML you will get a link that will start an edit session for the document.
API Call: https://api.webeditor.metaforce.net/Development/dxml/create
Example of body parameters in Postman:
{
    "username" : "User",
    "DataAsBase64": "PD94bWwgdmVyc2lvbj0nMS4wJyBlbmNvZGluZz0ndXRmLTgnPz4KPERhdGEgREVTQ1JJUFRJT049XRhPg==// TRUNCATED// ",
    "Document": "CaseLetter1",
    "MetaFile": "CompanyLetters"
}
Sample response:
{
    "DxmlUID": "c8dda6d7-b137-4a3f-ae1c-e46db95482a1",
    "StartURL": "https://webeditor.metaforce.net/WebEditor/0alIQV0R4KFP4I30r33qjiDFmKr57E%2BlU9e%2B8fpTgGXBRnjuuJ9QtzJbV9HoH59LBAUc6nOeCqXcbNfsThIOlM%2Frv%2B3MwUpm3f318Y2LbA0qw3GwCuhCNp2qgozLlUgUVPkBscSLfcBfMXyVi7OdLA%3D%3D",
    "ValidTo": "2023-09-10T05:54:47.6835658Z"
}
By copying the StartURL into the browser you will start a WebEditor session to edit the document. The document is editable until ValidTo date. This is controlled through the retention policy.
When editing is finished you can used the DxmlUID to recreate the PDF from the WebEditor session
Based on metadata you can create a PDF directly from Doxis Interact by using this REST API Call: https://api.webeditor.metaforce.net/Development/pdf/create
Example of body parameters in Postman:
{
    "username" : "User",
    "DataAsBase64": "PD94bWwgdmVyc2lvbj0nMS4wJyBlbmNvZGluZz0ndXRmLTgnPz4KPERhdGEgREVTQ1JJUFRJT049XRhPg==// TRUNCATED// ",
    "Document": "CaseLetter2 - Online",
    "MetaFile": "CompanyLetters"
}
This function will return the actual PDF that can be stored or view as you like.
Statistics
The Statistics API allows you to retrieve aggregated analytics data across systems in Doc Gen. It supports both standard REST and Prometheus-compatible metrics access.
This API is useful for:
- Monitoring user and system activity
- Integrating usage data with BI tools like Power BI or Prometheus
Authentication is based on OAuth 2.0 client credentials.
Below is a JavaScript example using axios to authenticate and fetch paginated statistics data:
how to authenticate: Authentication.
const axios = require('axios').default;

// This assumes you already have a valid access token.

const token = "<Bearer token>";

const pageSize = 1000;
const pageNumber = 1;
const apiUrl = `https://api.statistics-v2.stage.metaforcelabs.com/analytics?pageSize=${pageSize}&pageNumber=${pageNumber}`;

const requestOptions = {
    method: 'GET',
    url: apiUrl,
    headers: {
        'Authorization': `Bearer ${token}`
    }
};

axios(requestOptions)
    .then(response => {
        console.log(response.data);
    });
This script:
- Authenticates using OAuth 2.0 (Client Credentials flow)
- Calls the
/analyticsendpoint using a bearer token - Returns paginated statistics data from the Doc Gen platform
Read more here: Statistics documentation.