User Interface
The MetaTool user interface is your gateway to streamlined document development. This user interface is designed to enhance your interaction with the tool, providing a seamless and continuous overview of the entire document development process. The interface is organized into various distinct sections, each tailored to simplify and optimize your workflow. Get ready to experience efficiency and clarity like never before as you navigate through the intuitive design of the MetaTool interface.
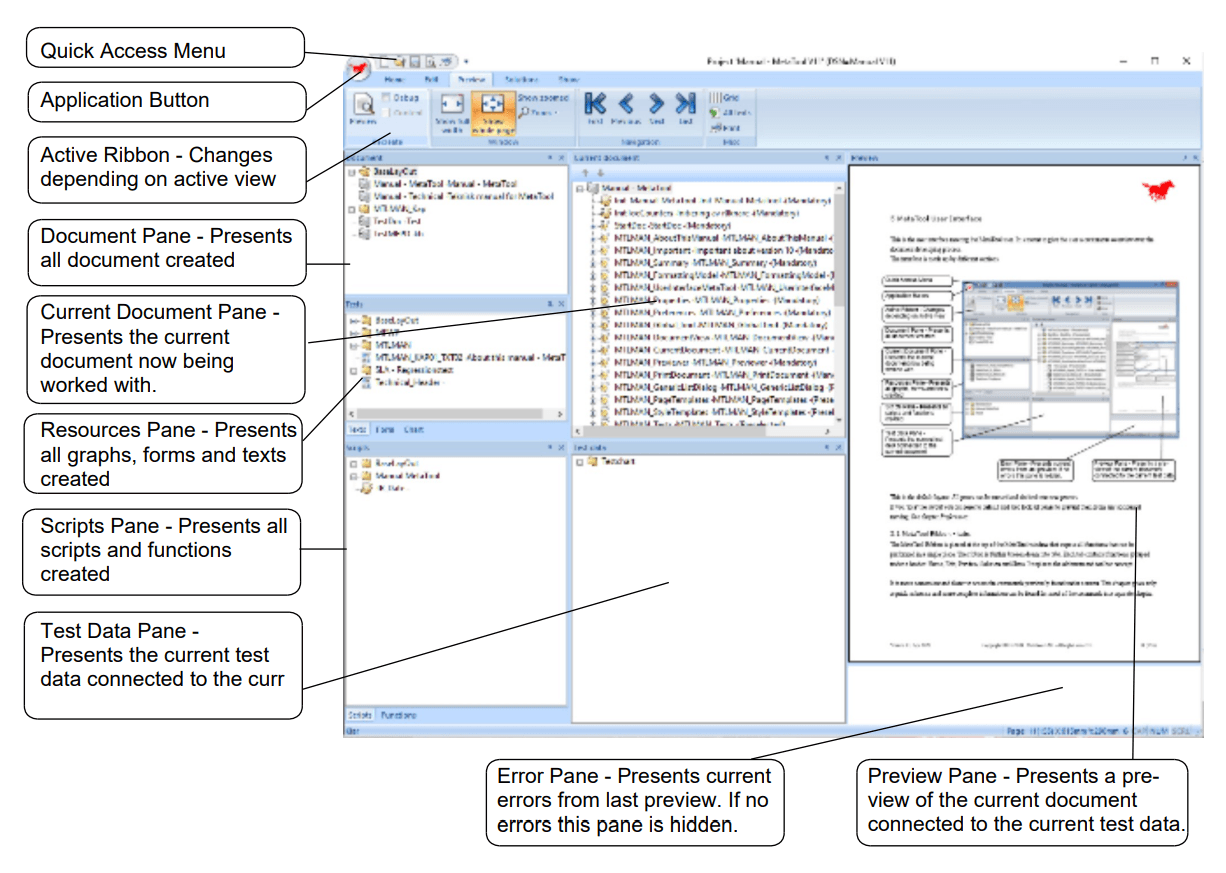
This is the standard layout configuration. All panels are movable and can be re-docked as needed. If you misplace or disrupt the layout, you can easily reset it to the default settings. Additionally, you have the option to lock all panels to prevent any unintended adjustments
MetaTool Ribbon - tabs
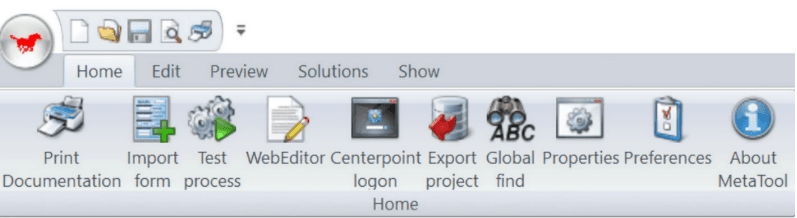
The MetaTool Ribbon is located at the top of the MetaTool window, providing easy access to all functions in one place. The ribbon is organized into tabs, with each tab grouping related functions under headers: Home, Edit, Preview, Solution, and Show. This design replaces the old menu and toolbar system, offering a more convenient and faster way to access commands that were previously hidden under menus. This chapter provides a quick reference, while more detailed information on most commands can be found in a separate chapter.
Ribbon - Home tab
| Function | Explanation |
|---|---|
| Print documentation | Create an XREF documentation for the current document in RTF format. |
| Import form | Creates a form from a PDF document |
| Test process | Starts process test. See manual MetaWrite manual. |
| WebEditor | Starts the WebEditor. In order to use this metaengine.config.xml must be configured correctly |
| Centerpoint logon | Opens logon screen for Cemterpoint. Metaengine.config.xml must be properly set up for this feature. NB 1: Logon screen is displayed automatically if Audit is enabled while trying to access a Solution. This is also true if you try to access the WebEditor or publish a logic file to Centerpoint without previous logon. This button could however be used, if you want to start with a signin (to get it done) or, with the right permissions, change to another tenant in Centerpoint. NB 2: The first time you logon you might experience a slight delay since Metatool is creating a user data directory for cached browser data. |
| Export project | Export multiple projects to one MetaLogic file, see chapter Solution - Export project. Available when working with a Solution database |
| Global find | Search the entire Metalogic for a matching string. See chapter Global find |
| Properties | Define MetaScript language, and Forms language (Online processing). It also displays resource statistics. See chapter Properties. |
| Preferences | User preferences. See chapter Preferences |
| About MetaTool | Displays program version, copyright and information about MetaEngine. |
Ribbon - Edit tab

| Function | Explanation |
|---|---|
| Texts | See chapter Texts |
| Phrases | See chapter Phrases |
| Style templates | See chapter Style templates |
| Form | See chapter Forms |
| Vector Object | See chapter Vector object |
| Document | See chapter Document - view |
| Page templates | See chapter Page templates |
| Table format | See chapter Table format |
| Column definitions | See chapter Column definitions |
| Color definitions | See chapter Color definitions |
| Charts | See chapter Charts |
| Images | See chapter Image |
| Exclude object | See chapter Exclude object |
| Scripts | See chapter Scripts |
| Functions | See chapter Functions |
| Data types | See chapter Data types |
| Variables | See chapter Variables |
| Process lists | See manual MetaWrite manual. |
| Service call / Transformer | See manual MetaWrite manual.. Datatransformer see chapter Transformer. |
| Test data | See chapter Test data |
| Assemblies | See chapter Transformer |
| Language | Shortcut to dialog accessible from dialog Phrase. For more information, see chapter Phrases and chapter Data types |
| Templates | See chapter Templates |
| CSS | See chapter CSS |
| Insertpoints | See chapter Insertpoints |
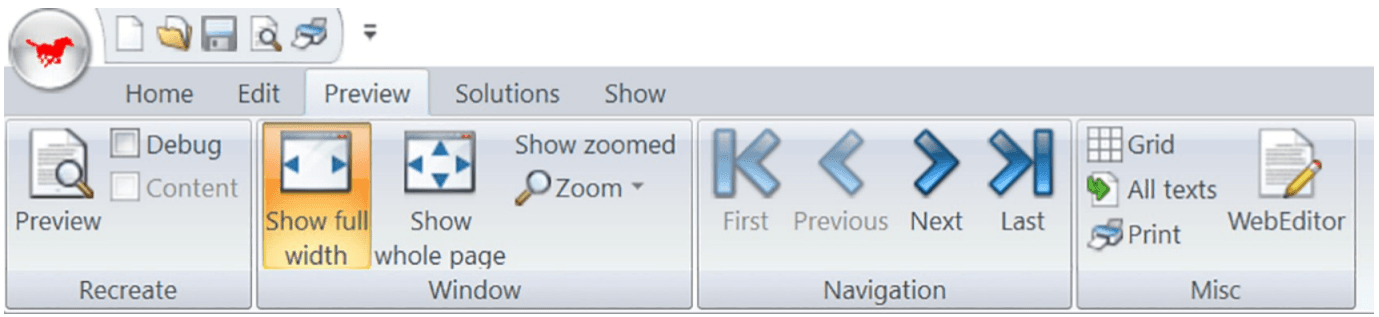
Ribbon - Preview tab
To preview the current document, select the Preview tab from the ribbon and click on the Preview, or click on the Preview icon on the Quick access toolbar. It will open the preview tab if not already opened, this will make common preview actions available. See below for a detailed description.
| Function | Explanation |
|---|---|
| Preview | Previews the currently active document. Is grey if no document has been selected as current document. |
| Debug | When checked it will start a script debugger when preview button is pressed. Uncheck this checkbox to stop this behaviour. |
| Show full width | Makes the document fill the full width of the preview panes |
| Show whole page | Displays the whole page of the document in the preview pane. |
| Show zoomed | Will make the document adapt “zooming” to the sizing of the preview pane. |
| Zoom | Select zoom interval from the dropdown: 50, 75, 100, 125, 150 and 200%. |
| First | Go to first page. Ctrl + Home can be used if preview pane is active. |
| Previous | Go to previous page. PgUp can be used if preview pane is active. |
| Next | Go to next page. Pg Dn can be used if preview pane is active. |
| Last | Go to last page. Ctrl + End can be used if preview pane is active |
| Grid | Displays a 10mm * 10mm grid on/off, and current page’s margins. |
| All texts | Display all document resources in preview, ignore any scripted row processing |
| Print preview result. | |
| WebEditor | Alternative way to access WebEditor (available from Home-tab as well) |
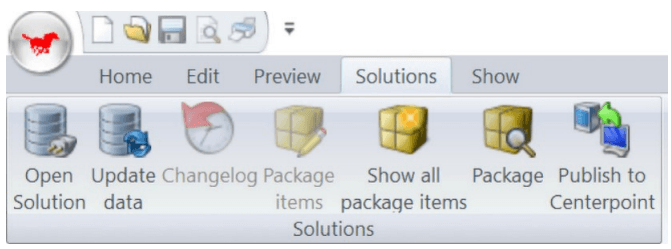
Ribbon - Solutions tab
A solution database makes it possible for more than one user to work at the same meta logic construct, called projects. See chapter Solution for more information.
| Function | Explanation |
|---|---|
| Open Solutions | Select a solution database to work against. |
| Update data | Refreshes all project data from database. |
| Changelog | See chapter Solutions - Change log via menus |
| Package items | See chapter Solutions - Package. |
| Package | See chapter Solutions - Package. |
| Publish to Centerpoint | See chapter Solutions - Publish to Centerpoint. |
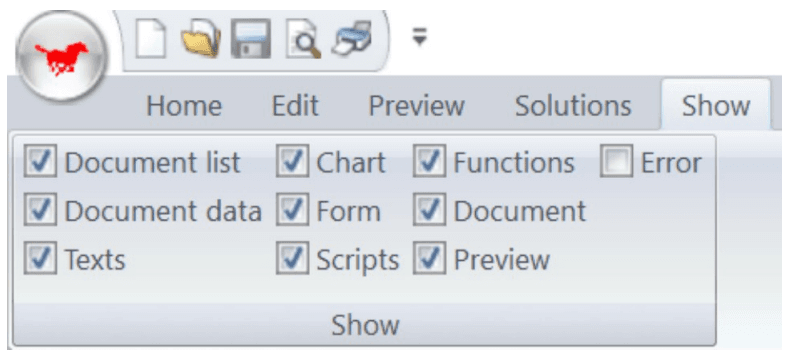
Ribbon - Show tab
Show ribbon tab, lists different panes that can be shown or hidden. Some panes are defaulted to tabbing panes but can be placed as separate panes if desired. An unchecked box means it will be hidden.
| Function | Explanation |
|---|---|
| Document list | Show/Hide the document list pane. |
| Document data | Show/Hide the test data pane. |
| Texts | Show/Hide the text pane tab. |
| Chart | Show/Hide the graph pane tab. |
| Form | Show/Hide the forms pane tab. |
| Scripts | Show/Hide the scripts pane tab. |
| Functions | Show/Hide the functions pane tab. |
| Document | Show/Hide the current document pane. |
| Preview | Show/Hide the preview presentation pane. |
| Error | Show/Hide the error pane. |
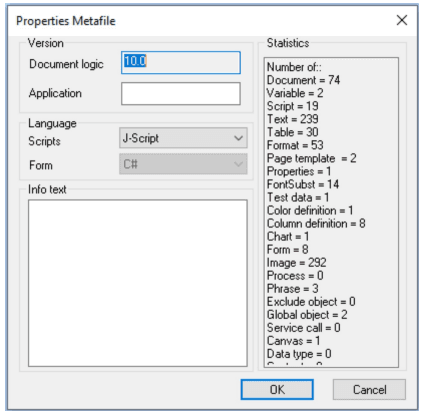
Properties
To see and change properties for MetaTool click on Home/Properties… see below.
| Function | Explanation |
|---|---|
| Document logic | Indicates the current version of MetaLogic file structure. Used by MetaTool if the loaded MetaLogic file needs to be converted. Only upwards conversion is possible. |
| Application: | Here you can state your application version of the MetaLogic file |
| Script | Script language for scripts and functions. Select between JScript and VB.net; but due to the portability, we recommend that you write your scripts in JScript |
| Form | For Input forms, displays the .NET language used for forms. |
| Info text | Not used |
| Statistics | Shows the number of documents, texts that are included in the MetaLogic application |
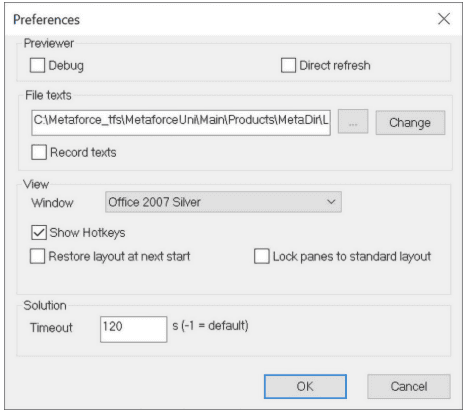
Preferences
To see and change preferences for MetaTool click on Home/Preferences…, see below
| Function | Explanation |
|---|---|
| Previewer/Debug | Puts the previewer in debug mode. This can now be more easily accomplished by checking the debugger checkbox on the Preview Tab. See chapter Debugging for a description of how to use a Script debugger. |
| Previewer/Direct refresh | If you want direct refresh of the document to be previewed; this means the preview view is refreshed when clicking Save. |
| File texts/File name | For creation and change of translation files. Default value may be Swedish when you start. To change it into English, click on the ”…” Button and select file “drive:/Metaforce installation folder and version/Lang”. Change button opens up the file for updating. Note: User must be Admin on the machine. |
| File texts/Record texts | The checkbox is a part of the translation files utility. It’s not described in this document. |
| File texts/Change | Is also a part of the translation files utility. It is not described in this document |
| View/Window | A list of selectable color schemes. |
| View/Show Hotkeys | Hints for the “quick key display” and hints for commands on the “quick key toolbar”. |
| View/Restore layout … | Resets program layout to the default layout. Use to recover “lost” windows. |
| View/Lock panes to … | Prevents any accidental moving of tool panes and keeps them locked. |
| Solution/Timeout | Sets timeout in seconds to Solution database. ( -1 for ODBC default) |
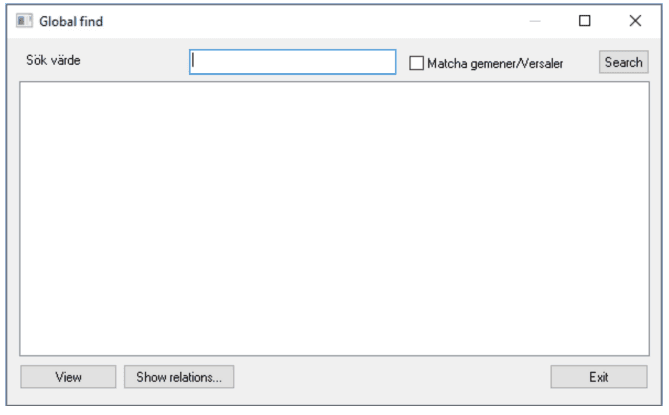
Global find
To search for and find all matching items in current Metalogic file click on Home/Global find…, when pressed the following dialog is shown, see below
| Function | Explanation |
|---|---|
| Search value | Enter the item to search for in this field |
| Match case | Select this checkbox if the value should match case |
| Search | Press the button to start the search. The matched records are listed in the box below. The match records can then be view (if possible), and show any relations the selected item have. |
| View | Opens the selected item, |
| Show relations… | List where the selected item have. |
| Exit | Close this dialog |
Document - view
The document view gives you an overview over your documents.
To create a new document, you simply right click in the Document field and select New…
Note: The dialog box is the same as for Add and Change, apart from that in Change you can not change the name of the document.
| Function | Explanation |
|---|---|
| Copy | for creating a new copy of the document |
| Delete | to delete the current document. |
| Show relations | Find out if the current document occurs as a part of other documents. See chapter Show Relations |
| Expand | Expands the document in the Current document window. |
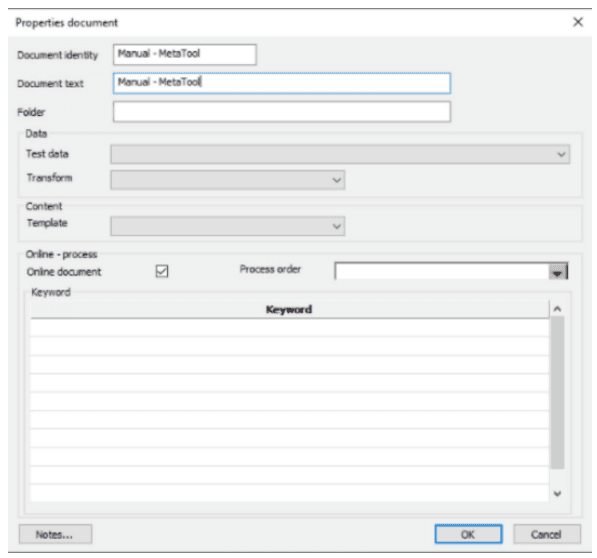
Document - properties
| Function | Explanation |
|---|---|
| Document identity | This is the name/designation of the document to be developed. Can not be changed when the document has been saved. |
| Document text | A descriptive text to the right of the Document identity. |
| Folder | The search path to the document in the document tree to be seen in the specific dialogbox |
| Data/Test data | A drop list where you can connect a test data file to the document. |
| Data/Transform | A drop list where you can connect a data transformer to the document. Only the top document can optionally have a transformer. |
| Online - process /Online document | This checkbox must be checked if the document shall be used in a MetaWrite process. |
| Online - process /Process Order | A Combobox that lists all processes in the actual MetaLogic file |
| Online - process /Keyword/Keyword | A descriptive text for the MetaForm Web users to be utilized when searching for documents. |
Current document
The main object in MetaTool is the Document. The document pane displays the structure for the active document.
In the Current document view you build the structure of your document. If you click with the right mouse button on the upper folder, you will see what you can add/create on the root level.
On top there are two arrows to move objects upwards or downwards in the tree. Select the current object and click at the appropriate arrow. You can also drag and drop the objects directly within the tree.

Icons under Current Document Pane
These icons can be seen in the current document.

Current document - context menu
In the Current document view you will get a context menu by clicking on the right mouse button. The context menu may look differently depending on what the user click on, Text, Reference, Command, Script, Table and Page template, but the differences are very minor. If any item is greyed then it is currently not allowed for the object type selected.
Here follows a description of the meaning of each item that can be shown on a context menu:
| Function | Explanation |
|---|---|
| Set row selectable (1) | The text object will be selectable when printed. There you will have the option to choose if the object is to be included or not. The object is not selected. See chapter Print document. The number in parenthesis is used in row script, see chapter Scripts. (For MetaWrite/Online process Only). |
| Set row preselected (2) | The text object will be selectable when printed. There you will have the option to choose if the object is to be included or not. The object is selected. See chapter Print document. The number in parenthesis is used in row script, see chapter Scripts. (For MetaWrite/Online Process Only). |
| Set row mandatory (3) | The text object will be mandatory when printed. See chapter Print document. The number in parenthesis is used in row script, see chapter Scripts. |
| Set row-script | If the text object is to be included when printed or not, is controlled by a script. To create a reference to a script, select the current script in the view, keep the right mouse button down and drag and drop on the text icon. |
| New text… | A new text object is created under the selected row. |
| New textchoice (MsWord)… | Makes it possible for the user to let the end user select between two or more texts. Insert the texts in the group. The first text will be preselected and the following will be selectable. (Only for MetaWrite). |
| New reference… | A new reference is created under the selected row |
| New command… | A new command (iteration) is created under the selected row. |
| New script.. | A dialog is displayed in which a new script can be created, or select an existing script for the object. |
| New page template.. | A new page template dialog is displayed in which a new page template can be created, or select an existing page template. It is placed under the selected row. |
| Change… | Change properties dialog for the selected object type is displayed in which a new object type can be created, or select an existing object type. The newly created/selected object replaces the current. |
| Delete… | Delete current selected object. |
| Show relations… | To be able to see where the selected object are used. See chapter Solution - Show relations. |
| Expand | Expand the reference node. |
| Change text… | Change in the related text. See chapter Texts. |
| Change script.. | Change the related script. See chapter Scripts. |
| Changelog | is available when connected to a Solution database. Displays a changelog dialog listing the selected object. See chapter Solution - Change log. |
Previewer
The previewer will continuously present the look of the current document. The previewer supports quick development of documents since the developer can easily see the effect of any additions/changes to the document in real-time.
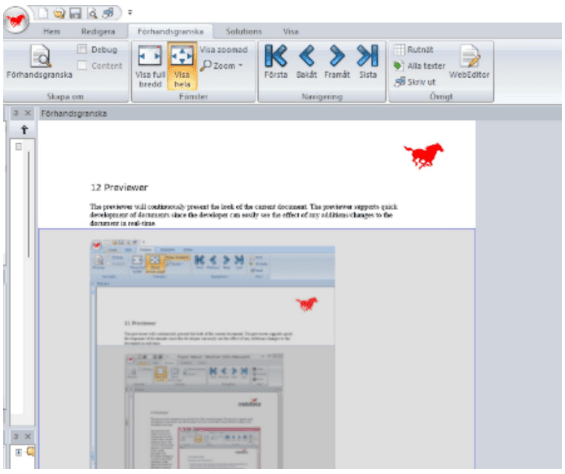
The previewer will display resources by marking the area they contain when selected in the previewer. The resource selected in the preview is also shown in the current document view. By double-clicking on a resource area in the previewer, it then opens the resource in the object’s resource editor.If an error exists in any resource, an error window is displayed underneath the previewer. See below for an example. By double-clicking on the error line, the resource that has an error is opened.
To preview the current document, select the Preview tab from the ribbon and click on the Preview, or click on the Preview icon on the Quick access toolbar. It will open the preview tab if not already opened, this will make common preview actions available. For more information to the Preview tab, see chapter User Interface, Ribbon - Preview tab.
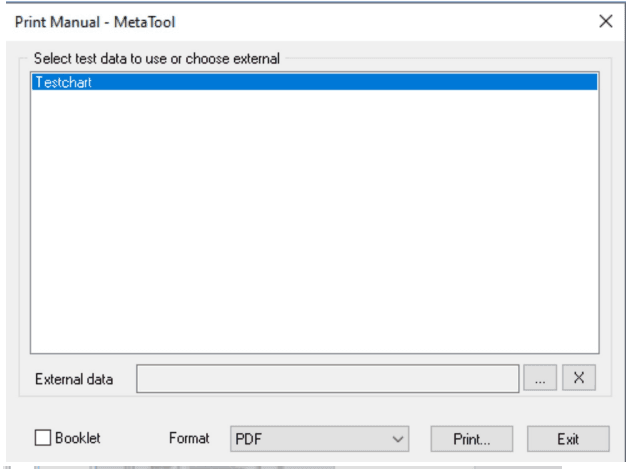
Print document
To see what the composed document will look like in a specific output format, select a defined output format. A suitable viewer must exist or it cannot be viewed. To create a printable output from the current document, select File/Print, CTRL+ P or the Print icon on the tool bar.
| Function | Explanation |
|---|---|
| Select the testdata you want to use in this print | In the list you will see all testdata in the MetaLogic file and the default data connected to the current document will be preselected. Some features only allowed for MetaWrite can not be shown on the printed document. You can also open external data from disk with the buttons ’…’ to open data and button ‘X’ to erase the choice. |
| Booklet | This checkbox will create a booklet output file, in the format selected. |
| Format | The format for the output data file depends on the Print configuration. If a viewer is linked to the output format the document will be presented with that viewer |
Generic list dialog
This is the main list dialog used to populate all different document items. It will be started from the ribbon Edit tab or when you use right mouse button click in any of the different panes in the main window.
The dialog box offers the option of full item search in all the input items to easily find the items you are looking for.
| Function | Explanation |
|---|---|
| Change | Opens item dialog for changing the selected item. |
| Copy | Copies the selected item. Is useful to quickly create a new item id. |
| Add | Opens item dialog to add a new item. |
| Delete | Deletes the selected item. If the item id is being used, a warning message is shown. |
| Show relations… | Is used to find where and in which documents a item occurs. See chapter Show relations |
| Copy/Disinherit | Is available when connected to a Solution. See chapter Solution. |
| Change log | Is available when connected to a Solution database and current project are connected to an change log. See chapter Solution - Change log. |
| Language | Will only be available when viewing Phrases. See chapter Phrases - Create Language Id. |
| OK | Is only available when this dialog is used to insert item into another item |
| Search | When searching for some specific content in an unknownn item. |
| Match case | For a more exact search. |
Page templates
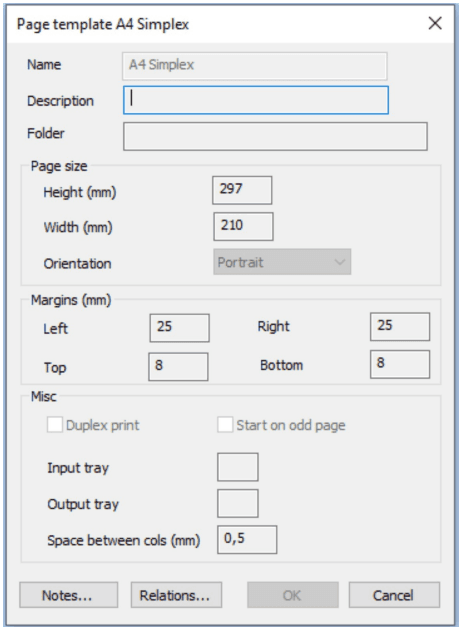
A page template decides the page width, height, side margins, in- and output tray, duplex or simplex printout, if the first page is to be a front page and the space between the table columns.
To manage or add Page templates that are going to be included in the documents, select either Edit/Page templates … or access the Page templates list through the “Current document item” dialog, which can be opened from the “Current document” view’s context menu. See chapter Generic list dialog
| Function | Explanation |
|---|---|
| Name | Name of the page template. It is locked can not be changed in Change page template |
| Description | A descriptive text of the page template |
| Folder | State search path in the tree for page template you have in the MetaTool. |
| Page size/Height in mm | State height of the page in mm. 297 for portrait A4, and 210 for landscape A4. |
| Page size/Width in mm | State width of the page in mm. 210 landscape A4, and 297 for portrait A4. |
| Page size/Orientation | Select between landscape and portrait. |
| Margins in mm/Left | State page left margin |
| Margins in mm/Right | State page right margin. |
| Margins in mm/Top | State page top margin. |
| Margins in mm/Bottom | State page bottom margin |
| Misc/Duplex print | Check the box if both sides shall be printed |
| Misc/Start on odd page | Check the box if the printout should start on odd page. |
| Misc/Input tray | State input tray of the printer. Optional are 1-8. See chapter Output - Printer configuration. |
| Misc/Output tray | State output tray of the printer. Optional are 1-3. See chapter Output - Printer configuration. |
| Misc/Space between cols in mm | State margin of the table cell to the left and the right. See below for an example. |
Style templates
If your company has a graphic guideline document in place, much of the work is facilitated since you then can adhere to a (hopefully) first-rate basic template.
You also ought to consider how you want to arrange the page indexing within the document. There is e.g. an option to have the text as page index included in the paragraph formatting.
To manage or add style templates that are going to be included in the documents, you select either Edit/Style templates… or use right mouse button click when working in a text. See chapter Generic list dialog
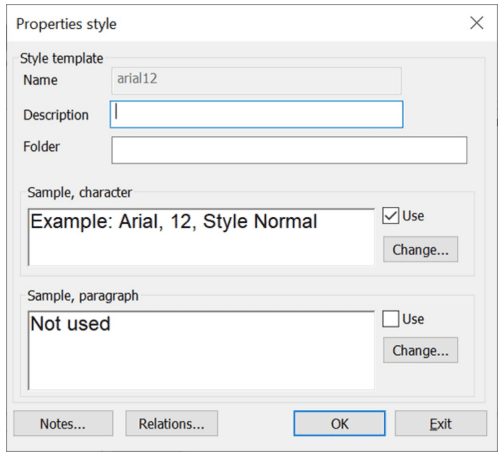
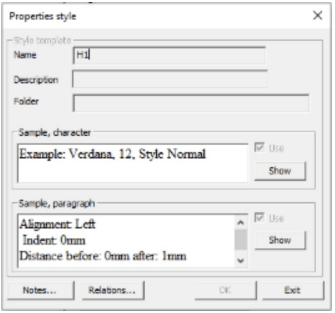
If you select Add or Change you have the option to set properties for a new form template or change the properties of the current form template.
| Function | Explanation |
|---|---|
| Name | Only optional for new form template |
| Description | Describe the form template shortly. |
| Folder | State search path in the tree of form templates you have in the MetaTool. |
| Sample, character | State what font to be used for the form template and if it is to be used (Check Use). To change font press Change… See below. |
| Sample, paragraph | State what alignment to be used in the form template and if it’s to be used (Check Use). To change alignment press Change… See below. |
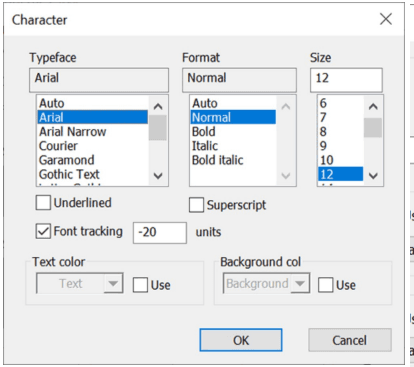
Sample, character: Change button
| Function | Explanation |
|---|---|
| Typeface | State what type font to be used. |
| Format | State what format of the type font to be used. |
| Size | State size of the type face. |
| Underlined | Select if the text is to be underlined. |
| Superscript | Select if the text is to be superscripted |
| Font tracking | Reduces or increases spacing between characters as in InDesign. If checked, value must be set and apart from zero. Please note that Font Tracking does not work in conjunction with the WebEditor or hyperlinks. |
| Text color | Select if text is to use color text. |
| Background color | Select background color of the text and if it’s to be used. |
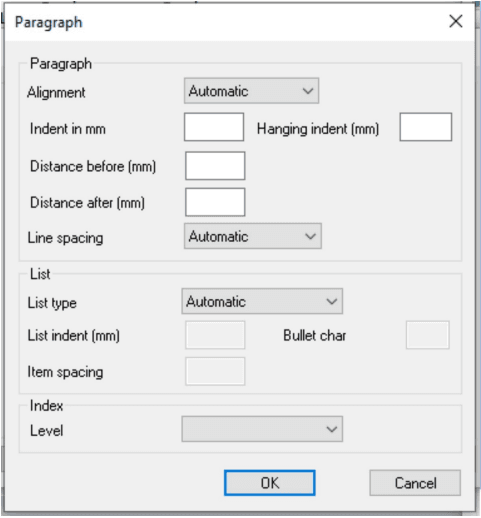
Sample, paragraph: Change button
| Function | Explanation |
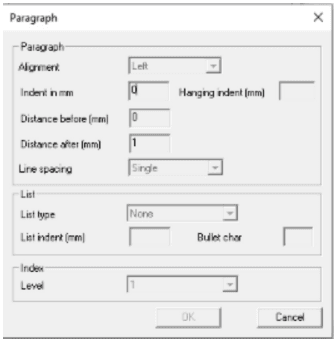
|---|---|
| Paragraph/Alignment | State alignment of the text. The options are Left, Center, Right and Margin. It is also possible to select Automatic. If you select Margin (margin alignment) you will see an additional field, where you can State max value in mm between the words in a line. The min space value is by default set to one space character. |
| Paragraph/Indent in mm | Set the space in mm, how far the paragraph is located proportionally to the current left margin. |
| Paragraph/Hanging indent in mm | Set the space in mm, how far the paragraph is will hang proportionally to the current left margin. |
| Paragraph/Distance before in mm | Set the space in mm, how far down the paragraph is to be pushed proportionally to the previous end of the document object. |
| Paragraph /Distance after in mm | Set the space in mm, how far down the end of the paragraph is to be pushed. |
| Paragraph/ Line spacing | Set the value of the line spacing. The options are Automatic, Single space, Double spaced, 1,5 lines and Exact. If you select Exact you will get an additional field where you can State line spacing in percentage. Normal line spacing is 100 %. If you select line spacing less than 100 % you risk having the lines overprint one another. |
| List/List type | State if you want a bulleted or numeric list. The options are Automatic, Bulleted list, Ordered list and None. If you select bulleted list you also can fill in the field. Ordered list is just numeric, starting count at “1.” and so on and only one dimensional, that is no levels are supported. |
| List/List indent in mm | Set the value of how far in on the line in mm the bulleted list is to be located proportionally to the current left margin. |
| List/Item spacing in mm | Set the distance in mm between list items |
| List/Bullet char | The character entered in input field will be used as a bullet character. It defaults to the bullet character. |
| Index/Level | State if you want the content of the paragraph to come out as a page index (in Adobe PDF and IBM AFPDS). |
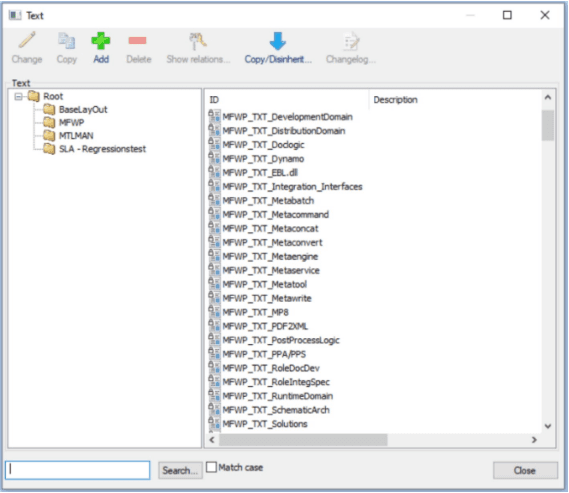
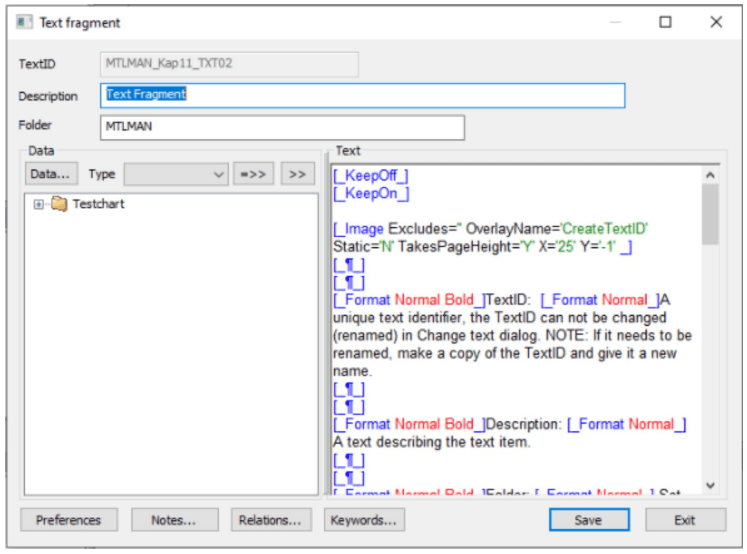
Texts
To add texts that are going to be included in the documents, you select either Edit/Texts… or use right mouse button click in the text view. See chapter Generic list dialog .
| Function | Explanation |
|---|---|
| TextID | A unique text identifier, the TextID can not be changed (renamed) in Change text dialog. NOTE: If it needs to be renamed, make a copy of the TextID and give it a new name. |
| Description | A text describing the text item. |
| Folder | Set the folder name in the Resource list tree. This can be used to structure the texts for easier look-up. |
| Keywords | Opens up the Keyword dialog. |
| Data | Present available variable data connected to the document. To enter a variable into the text, select the wanted variable and press >> button. =>> button enters a variable including the nodes, if any. |
| Test data | To connect new test data, this test data is temporary for the current text id since it is not connected to the document. See chapter Test data. |
| Text | Input the required text. Apart from entering variables in your text (see above) you can write a number of formatting commands. See further in chapter Texts - Formatting commands. |
| Please note | Symbol fonts in the Text editor needs some additional clarification. |
The MetaTool editor is not a WYSIWYG editor and it uses the font selected for the editor, only “Arial” and “Courier New” can be selected. Since these fonts do not support the symbol they cannot be displayed. If a symbol is copied from outside and pasted into the editor. It will initially display the symbol since the symbol “contains” the symbol and its font, but after the text has been saved and re-opened it will no longer display the symbol. The reason is that the “contained” font for the symbol has been removed when saved and only the codepoint, its numerical value, is kept. To further confuse the matter if the codepoint, its numerical value, do not exist in the font used by the editor then it will only be displayed as a blank character.
Since the editor isn’t WYSIWYG the characters displayed are not a representation of the real one displayed when formatted. The editor uses a fixed, non symbol, font for display so obviously the characters are displayed as a regular font and not a symbol one. However, the editor displays the font quite correctly when you paste a symbol font from for instance world but is displayed with the editors fixed font when reopened again. It could be quite confusing however if the codepoint is missing for the editors font as the character now will be displayed as a mere blank.
When converting an older MetaLogic file, a version prior to Unicode support, a special conversion is done for characters that have symbol codepoints to make certain that the codepoint is correct when to Unicode.
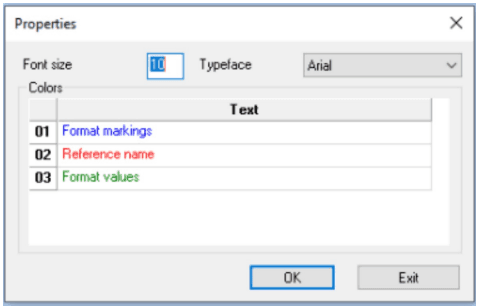
Preferences for the editor
| Function | Explanation |
|---|---|
| Properties | Here you can select which colors to set for variables and formatting commands in the text window. Click on the number in the first column and select color. Furthermore you can select font size and type face in the text window. |
Keyword dialog
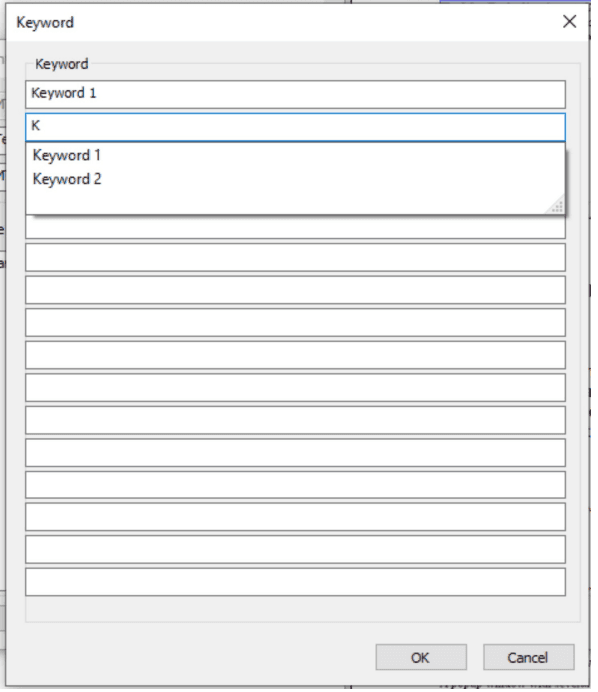
In the fields you can enter keywords associated with the text. You will get autocomplete help entering keywords based on earlier keywords entered in other texts.
The autocomplete is case insensitive and will return the first entry it finds in the autocomplete list. However, keywords saved will keep the case as they were saved. Metatool will give a clear warning if a keyword exists in a different case than the one entered.
Metaforce warmest recommendation is to have a clear understanding what keywords to use before entering them in Metatool…
Functions for editing text
Right click in the text window and select Insert. A popup window with several choice of format commands will show up
| Function | Explanation |
|---|---|
| Style | Dialog for format settings |
| Variable | Declare varables and give them their settings. |
| Script | In the Script editor you write rules and common functions. Code language: Jscript or VB.net. |
| Table | The table editor let you create the declarations for your table. With or without lines and grids. |
| Phrase | If the same text shall be written in different language, the texts can be written in a phrase. The text that will be written are selected from a locked or variable language code that are available in the application. |
| Chart | Dialog for different types of charts. |
| Barcode | Dialog for a simple creation of a barcode. |
| Tab settings | Dialog for setting the values for tabs |
| Vertical distance | Line feed in millimeters |
| Line | Dialog for drawing a line between two points. |
| Rectangle | Dialog for drawing a static or dynamic placed rectangle. |
| Textbox | Create a text area that can be placed in a static area on the letter or be dynamic. |
| Image | Dialog to select an image. The format is PNG. |
| Vector Object | Dialog for select and inserting a vector object |
| Columns/Columns end | Settings for start and end rows for columns. |
| Table of content | Settings for a table of contents that will be inserted in the beginning of document. |
| Linebreak | A command for making a line feed. Must be used in the text object when editing, though the Windows line feed doesn’t work in the text object. |
| Paragraph break | A command to initiate a paragraph break. |
| Document Page | The pagenumber for a page in a document |
| Document all pages | The total number of pages in the document |
| Section number | If more than one section appears in the document the section number that separate them can be used in combination with the page- and section page number. |
| Section page | The pagenumber for a page in a section within the document. |
| Section pages | The total number of pages within the the section. |
| Keep On / Keep Off | Command for keeping text parts together on the same page in the documant. |
Keyboard shortcuts
| Function | Explanation |
|---|---|
| Shift+Enter | for hardline break |
| Ctrl+Enter | for softline break. |
| Ctrl + ’-‘ | for soft hyphenation. |
| Ctrl+F | Find dialog, works in some editor dialogs like the text-, script- or textbox-editor. |
| Ctrl+H | Find and replace dialog, works in some editor dialogs like the text-, script- or textbox editor. |
Formatting commands
This chapter will describe the supported formatting commands that can be used to control a text presentation. It is recommended to add a Style command at the beginning of each text, since each texts inherent the style definition before it. This behaviour of adding a style at the beginning of each text makes certain that the text uses the correct style settings.
Style
Defines the type face, format, size, and paragraph setting, like justification, line spacing. See chapter Styletemplates. See below for an example.
[_Format Normal_]Variable
Define variables that will have certain properties and are often used in MetaWrite for forms. See chapter Variables.
Script
Makes it possible to add script controlled result to a text and adds additional flexibility to a text. See chapter Scripts. See below for an example.
[_Script R_GetInvoiceRowCount_]Table
Is used to structure the page layout, and are often used to create repeatable output like order list. See chapter Table format. See below for an example.
[_TableBegin Total_]
[_TableCell_]
[_TableCell_]
[_TableEnd_]
Phrases
Used to support multiple languages. See chapter Phrases. See below for an example.
[_Phrase Phrase_001_]Chart
Add Business charts, like a PIE chart. See chapter Charts. See below for an example.
[_Chart Offert_]Common properties for Barcode, Line, Rectangle, Textbox and Image
| Function | Explanation |
|---|---|
| Placement and size/Horizontal in mm | The resource X-value location in mm, can be -1 (meaning ignore). |
| Placement and size/Vertical in mm | The resource Y-value location in mm, can be -1 (meaning ignore) |
| Placement and size/Line width in mm | The line width in mm |
| Placement and size/Height in mm | The resource height in mm |
| Placement and size/Line color: | The color of the resource. |
| Placement and size/Take page height | State if the resource is to take page height. For the formatting commands, Textbox, Line, Rect, Image and Form, which has a checkbox option ”take page height”. Take page height means that the formatting command will be affected by, or cause an effect on, the text placements. An example may clarify this better. |
Example
If a textbox has the ”take page height” checked then it will adapt itself to previous texts positions, its vertical value should have the value of ’-1’ (Y=’-1’). The text following the textbox will be placed after according to the area size of the textbox.
This is a text that will create an area of 50*20mm and will flow according to previous texts and also affect the next texts.
[_TextBox CX='50' CY='20' ItemType='TextBox' LW=" Radius=" SpaceX=" SpaceY=" Static='N'
TakesPageHeight='Y' X='-1' Y='-1'_]
Your text goes here...
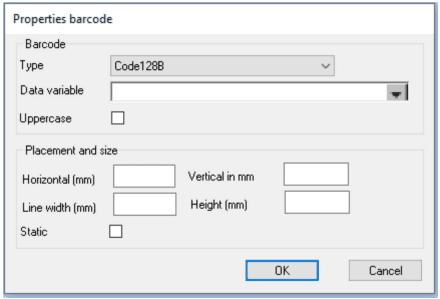
[_TextBoxEnd_]Barcodes
| Function | Explanation |
|---|---|
| Barcode/Type | Select which type of barcode to be used; Code 128A, Code 128B, Code 128C, Datamatrix, Kix Barcode, QRcode, Code39, Code39 Full ASCII or Code39 mod 43 |
| Barcode/Data variable | Select which data variable the barcode is to be connected to. |
| Barcode/Uppercase | State if the barcode is to be in uppercase only. |
| Placement and size/Static | State if the placement and the size of the barcode are to be static. |
| Take page height | Applicable for QRCode and Datamatrix, where the actual size can grow depending on data value. |
Example of a result in the text window:
[_BarCode Attr='Price' CX='1' CY='10' CodeType='Code128B' Static='N'
UC='N' X='10' Y='10'_]
Where Attr= holds the data variable name
Tab settings
Define tab stops. Tab stops can be used as simple tables. Tab stops are dependent on left/right margins. All tab stop values should be defined from the left margin, i.e. Tabs=‘20;30;’ means 20 mm from left margin and 30 mm from left margin. The default tabular value (Def=‘10’) is relative to the previous tabular stop and used to calculate the tabular value when the tabular position is undefined
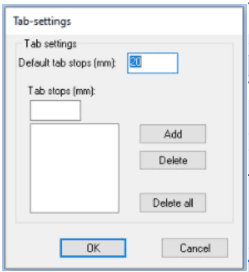
| Function | Explanation |
|---|---|
| Default Tab Stops in mm | Define the default tab stops in mm |
| Tab Stops in mm | Entry field for tab stop, use the Add button to add it to the list. |
| Add | Add the tab stop to list. |
| Delete | Remove the selected tab stop from the tab stops list |
| Delete All | Remove all tab stops from the tab stops list. |
Example :
[_TabSet Def='10' Tabs='20;30;'_]Vertical distance
| Function | Explanation |
|---|---|
| Distance/Space in mm | State required vertical spaces in mm |
Adds vertical space in mm. It can be used instead of linebreaks since linebreak space depends on the active style and therefore is not always the best way to add space in text.
[_Space Height='10'_]Line
Note! If both height and width are other than zero, can even be negative values, the result is a diagonal line. A form can be used to find out the width and height of a line by using the form’s line draw tool.
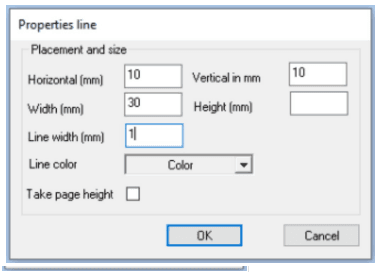
Example of a result in the text window:
[_Line CX='30' CY='' LW='1' Static='Y' TakesPageHeight='N' X='10' Y='10'_]Rectangle
Note : Can not be used with Metawrite
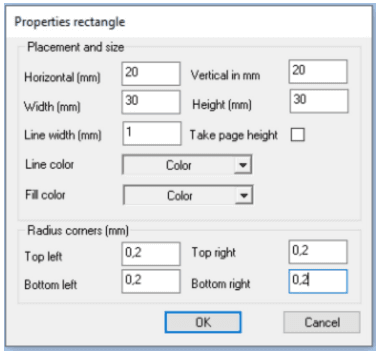
| Function | Explanation |
|---|---|
| Placement and size/Fill color | The fill color of the rectangle |
| Radius of rounded corners in mm | State radius of rounded corners (in mm) if any, for the four corners of the rectangle |
Example of a result in the text window:
[_Rect CX='30' CY='30' LW='1' Static='Y' TakesPageHeight='N'
X='20' Y='20' {Corners CoBL='0,2' CoBR='0,2' CoUL='0,2' CoUR='0,2'}_]
Textbox
Create an area where text is to be positioned. The position of the text area can be outside the page margins. The text in a textbox can be rotated. For a description of Take page height, see chapter Texts - Common properties for Barcode, Line, Rectangle, Textbox and Image.
MetaWrite: Replacebox checkbox makes a text replacable for a saved document in Dynamo by using a MetaWebService call. See MetaWrite document for more information. Note! If to be used in MetaWrite/Word the Textbox will only be a placeholder with a given static postion, size and text. No other settings are respected.
Many other formatting commands can be included in a textbox but only a few can include a textbox, eg. Columns, and Phrases. Be aware that when using TextBox in combination with MetaWrite and WebEditor the result is not always the same as when creating ondemand-documents as the nature of a TextBox as to place items statically. This goes against the nature of the dynamic formatting in the document body part of a MetaWrite and WebEditor! Be sure to test the result thoroughly before deploying your document logic to production…
When you have set height of the textbox (other value than -1) the textbox will truncate all text and data written outside the height of the textbox
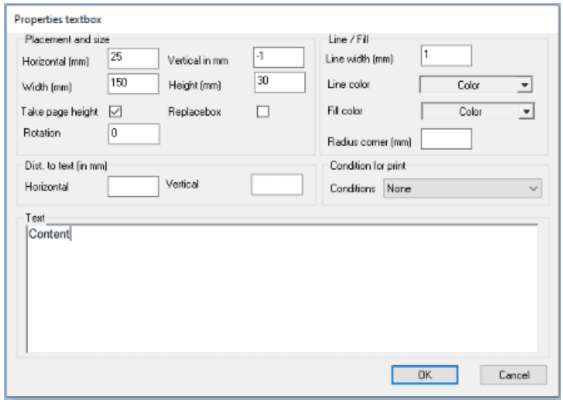
Example of a result in the text window:
[_TextBox CX='150' CY='30' Conditional='' ItemType='TextBox' LW='1' Radius='0,2'
ReplaceBox='0' SpaceX='' SpaceY='' Static='N' TakesPageHeight='Y' X='25' Y='-1'_]
Content
[_TextBoxEnd_]| Function | Explanation |
|---|---|
| Placement and size/Rotation | State in what angle the text is to be rotated. The following standard degrees are supported by all output formats 0°, 90°, 180° and 270°. For PDF, and PS the degrees can be between 0-359°. If a degree is stated that is outside the standard format and the output format do not support the stated degree, it is rounded to the nearest valid standard degree (0°, 90°, 180° and 270°). |
| Dist. to text (in mm)/Horizontally | Margin between line and text to the right and to the left. |
| Dist. to text (in mm)/Vertically | Margin between line and text at the top and at the bottom. |
| Line/Fill/Line weight in mm | The weight of the textbox in mm |
| Line/Fill/Line color | The line color of the textbox. |
| Radius of rounded corners in mm | State radius of rounded corners (in mm) if any, for the four corners of the textbox. |
| Condition for print | Select condition if textbox is to be printed or not. Following conditions exists: None - The textbox will always be printed. Print out if adjacent pages exist - The textbox will only be printed if more pages follows the textbox page. Print out if pagecount > 1 - The textbox will only be printed if document consists in more than one page. |
| Text box rotation | For output types that support rotation in 360 degrees the following information will make it easier to understand how it works. The placement of the rotated textbox is determined by the baseline of the font used, the baseline is at the top of the font. This means when a textbox is rotated, the placement will shift, depending on the rotation degree value. See the following figure which have the same values in X=, Y=; but with different rotations; and will rotate around a central point. |
Image
See chapter Image. Example of a result in the text window
[_Image Excludes='' OverlayName='AcmeRGB' Static='N'
TakesSpaceHeight='N' X='-1' Y='-1'_]
Vector object
See chapter Vector object. Example of a result in the text window:
[_Canvas CX='15' CY='15' Name='VectorID' Static='N' TakesSpaceHeight='N' X='-1' Y='-1'_]Columns
Splits the text into the number of columns specified until Columns end is found. The columns can be weighed to balance the text in each column.
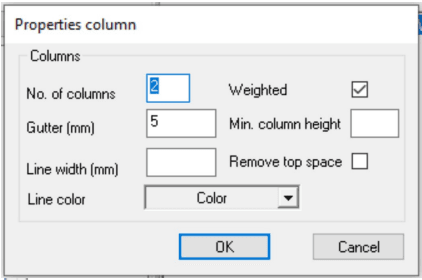
| Function | Explanation |
|---|---|
| Columns/No of columns | State number of columns intended. |
| Columns/Weighed | State if the columns are to be weighted. |
| Min. column height | State minimum column height and affects how the column will be weighted. |
| Remove top space | Removes empty top space in the “following” column(s). |
| Columns/Gutter in mm | State the space between the text columns |
| Columns/Line width in mm | State line width if vertical line(s) is preferred between the columns. |
| Columns/Line color | Color of the vertical line(s). |
Example of a result in the text window with columns NOT weghted:
[_Columns ColSpace='3' Cols='2' LW='1' MinColHeight='' RunningBreak='N'_]Example of a result in the text window with weighted columns:
[_Columns ColSpace='3' Cols='2' LW='1' RunningBreak='Y'_]Column end
Example :
[_ColumnsEnd_]Table of contents
Collects all levels defined for the TOC until the end of document processing. The levels collected are the levels defined in a style template definition. For example H1.
For Paragraph.. enter Index level 1, 2, 3.. depending of your choice.
Open the first text object that shall be picked up by the TOC and right click to select Insert Table of Contents.
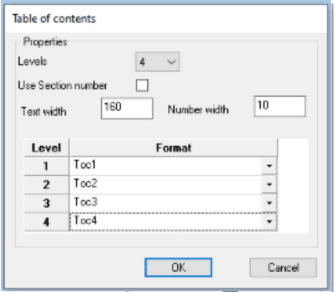
| Function | Explanation |
|---|---|
| Properties/Levels | Levels displayed in the table of contents. |
| Properties/Use section number | If checked, will use section page numbers instead of page numbers. If multiple section exists then the section numbering will be (sectno:sectpageno), eg 1:1, 2:2. |
| Properties/Text width | Text width in the table of contents, in mm. |
| Properties/Number width | Page number width in the table of contents, in mm. |
| Properties/Format | The style template that will be used for the level in the TOC. See below |
[_Toc NoColWidth='10' TextColWidth='160' UseLevels='4' UseSectNo='0'
{Level Style='Toc1' }
{Level Style='Toc2' }
{Level Style='Toc3' }
{Level Style='Toc4' }_]
You need a script to reset your TOC. Place it in the top of the document structure. Below you can see an example.
Line Break
Creates a new line. If used in a style-template that have bullet-list enabled it will then also create a new line with a bullet symbol. Hot key is Shift+Enter.
[_¶_]Line break (soft)
Creates a new line. If used in a style-template that have bullet-list enabled it will then only create a new line that is indented according to the bullet-list definition. Hot key is Ctrl+Enter.
[_«_]Paragraph break
Initiates a paragraph break. It will lead to a line brek with all the attributes defined in the current paragraph. The behaviour of applying all the paragraf attributes (not just the bullet) is what differs a Paragraph break from a regular Line break
Be aware that when using the Paragraph break in combination with the WebEditor the result will be a new text item after each Paragraph break (very much like a separate Text in the document logic tree). The result will differ in the WebEditor compared to generating a document from the same template as an ondemand or batch document. This difference will not be changed due to historical reasons.
[_§_]KeepOn/KeepOff
KeepOn: Start keeping text together. If the text composition makes a text break the whole paragraph is moved to the following page.
[_KeepOn_]KeepOff: Ends keeping text together.
[_KeepOff_]Auto Generated Values
MetaEngine supplies a number of auto generated values. They can be used to display page numbers, section numbers etc. All generated values begin with an AutoValue tag. These auto generated values cannot be queried by a script.
These tags should not be used in texts with the the pagaragraph’s ‘Indent’-property set to anything but zero, as this will be messed up when the document engine recalculates the text when the document has been split into pages and the pages are counted.
Document page
Returns the page number. If used in conjunction with the WebEditor do not put this tag in an editable part as it will not work!
[_AutoValue Value='DocNum'_]Document number of pages
Returns the total number of pages in document. If used in conjunction with the WebEditor do not put this tag in an editable part as it will not work!
[_AutoValue Value='DocCount'_]Section number
Prints the section number. If no active section exist or if it is the first created section a number 1 (one) is printed. If used in conjunction with the WebEditor do not put this tag in an editable part as it will not work!
[_AutoValue Value='CurrSect'_]Section page
Prints the section page. If used in conjunction with the WebEditor do not put this tag in an editable part as it will not work!
[_AutoValue Value='SectNum'_]Section pages
Prints the total number of pages in the active section. If used in conjunction with the WebEditor do not put this tag in an editable part as it will not work!
[_AutoValue Value='SectCount'_]Start colleting content
Starts collecting the specific content
[_ContentCollectionStart Adress_]End collecting content
Stops collecting the specific content.
[_ContentCollectionEnd_]Languages
Language is used in multiple scenarios:
-
Phrases - to select the correct phrase language
-
PDF/UA - to set the language for the PDF file
-
WebEditor, InsertPoints and TextLibrary - to ease up and set the language when selecting a text to insert in the WebEditor from the TextLibrary
Create Language Id
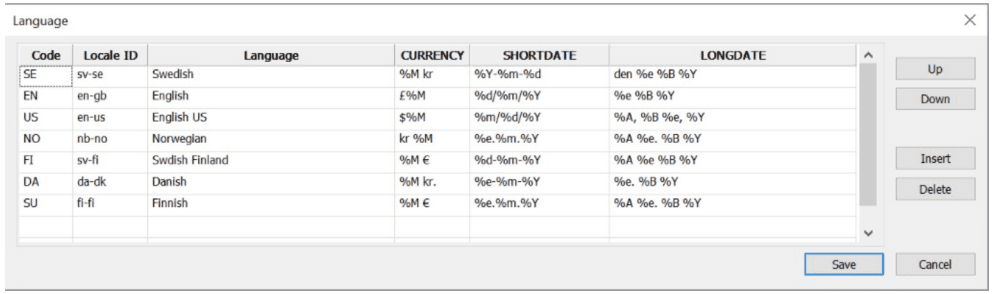
Select Language
| Function | Explanation |
|---|---|
| Code | Language Id |
| Locale ID | A good reference can be found at http://ss64.com/locale.html Some examples over countries and their Locale ID. (Short string) value |
| Language | Language description |
| CURRENCY | Formatting rule for data type CURRENCY Syntax: Use %M for digits formatted with thousand seperators and decimal point according to locale. Currency (i.e. kr or $ placed as wanted) |
| SHORTDATE | Formatting rule for data type SHORTDATE Syntax as described here: https://en.cppreference.com/w/cpp/chrono/c/strftime |
| LONGDATE | Formatting rule for data type LONGDATE Syntax as described here: https://en.cppreference.com/w/cpp/chrono/c/strftime |
Remarks: Formatting rules for CURRENCY, SHORTDATE and LONGDATE can be used to suppress the original behavior of these data types. It’s also advisable to use these when running MetaEngine on a Linux platform, as the results from getting system formatted values will differ from Windows and Linux and thus will produce different results on the Windows development platform and the Linux backend.
| Function | Explanation |
|---|---|
| Up | Moves the current row one step up. The language on the top row is default |
| Down | Moves the current row one step down |
| Insert | Inserts a new row above current row |
| Delete | Deletes current row |
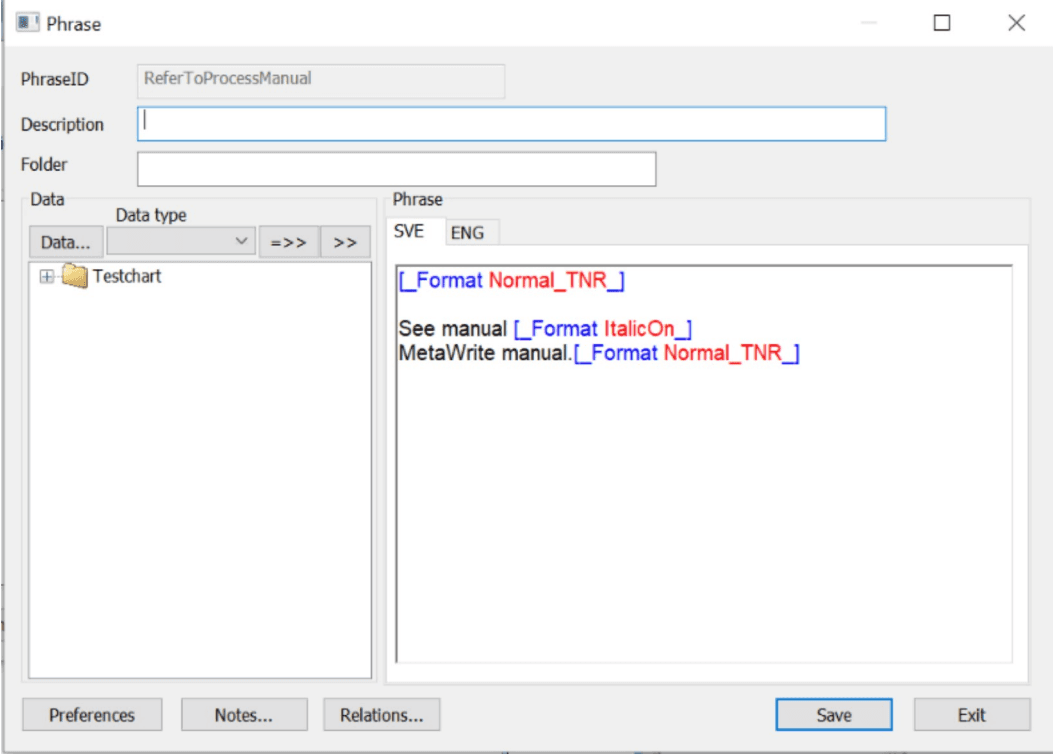
Phrases
Phrases make it possible to translate document texts, words and phrases into two or more languages. You set up your phrases for each document with a unique Phrase Id.
Create Language Id
See chapter Language
Valid usage of Phrases
The valid usage of a Phrase is that it can be included in a Text.
The supported objects in a Phrase are:
-
Styles
-
Variables
-
Scripts
-
Tab settings
-
Vector objects
-
Linebreak (hard and soft)
-
Paragraph break
-
Document page and Document number of pages
-
Section number
-
Section page and Section pages
Script methods
Two functions are associated with Phrases. They are:
SetPhraseLanguage(CurrentLanguage, DefaultLanguage);and
vPhrase = GetPhrase(PhraseID, Language);See chapter Scripts - Miscellaneous methods.
Textchoice (Intended to be used with MetaWrite and WebEditor)
When creating Microsoft Word and WebEditor documents there is a function in the MetaTool that lets the end user select between texts. This is called Textchoice… To add texts that are eligible to be included in the documents, you select either Textchoice… or use the right mouse button click in the document view. Then connect the texts to the textchoice. See chapter Generic list dialog.
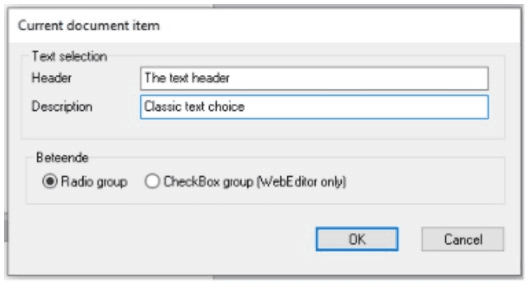
Textchoice Radio group (classic behavior, works in both Metawrite and WebEditor)
The first text in the group will always be preselected, while the others will be selectable. Only one text can be selected at a time. It is not possible to view any of the texts in the MetaTool preview. To see the result, use the print function combined with DOCX.
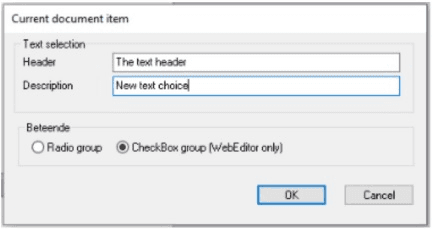
Textchoice CheckBox group (new behavior, works only in WebEditor)
No text is preselected, and all texts are selectable. It is not possible to view any of the texts in the MetaTool preview.
Using textchoice with printed documents
It’s possible to make the first text in a textchoice to be printed when using a channel configuration other than DXML (as used by MetaWrite and WebEditor). This behaviour will be activated by setting the attribute ShowFirstTextInTextPart=“1” in either “metaengine.config.xml” or in SpecialSettings of separate channel configurations (including ‘EMF’ for preview). Setting it in “metaengine.config.xml” will activate it on all static drivers.
Note:
- If running batch with multiple outputs the ShowFirstTextInTextPart=“1” in “metaengine.config.xml” should be used. SpecialSettings on the channel configurations will not work.
- ‘ShowFirstTextInTextPart’ is supposed to be used in either “metaengine.config.xml” or in the print configuration. Mixing between the two ways may give unpredictable results.
Process formatting commands
This chapter will describe the supported formatting commands used in Metaforce Process handling that can be used to control input and write protection in Word document.
Content control…
Used to create input field in Word. Opens dialog to enter default text for the input field and optional label.
Write On/Write Off
Write On: Starting point for editable area in the Word document.
See manual MetaWrite manual.
[_WriteOn_]Write Off: Ends keeping editable area in the Word document.
See manual MetaWrite manual.
[_WriteOff_]The behaviour of WriteOn/WriteOff is different in the WebEditor compared to MetaWrite as WriteOn/WriteOff is scoped in regards to selectable texts. Say for instance that the document template has a mandatory text that sets WriteOn. Right after follows a selectable text (or textchoice text) that sets WriteOff. The last WriteOff is scoped to the selectable text. Texts that follow the selectable text will inheriate WriteOn from the text before the selectable text. This will hopefully lead to a clearer understanding of WriteOn/WriteOff.