Pages Manager
Summary
Pages Manager is a management application that lets you manage Pages environments and logic files developed in Metatool. It will keep track of all your logic files versions and where they are deployed. You can deploy logic files directly from Metatool but need Pages Manager for full control.
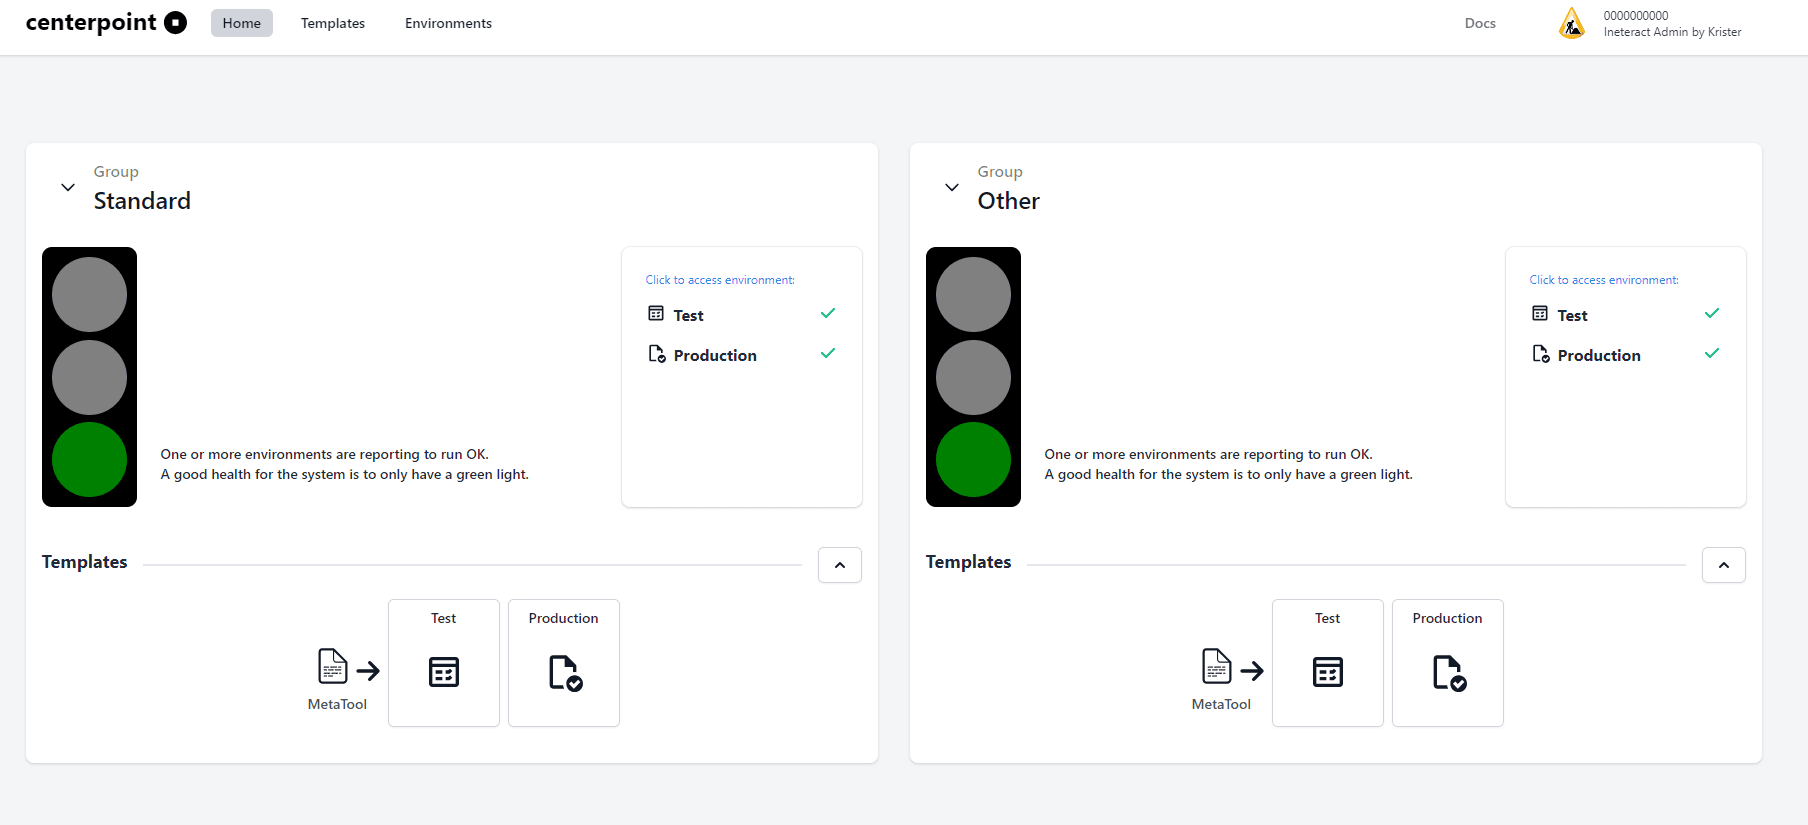
Home
The Home page gives you an status overview of your configuration and templates. From the Home page you can either use the tabs or the links on the page to navigate to the Templates and Environments pages.
Templates
The Templates page lets you manage logic files.
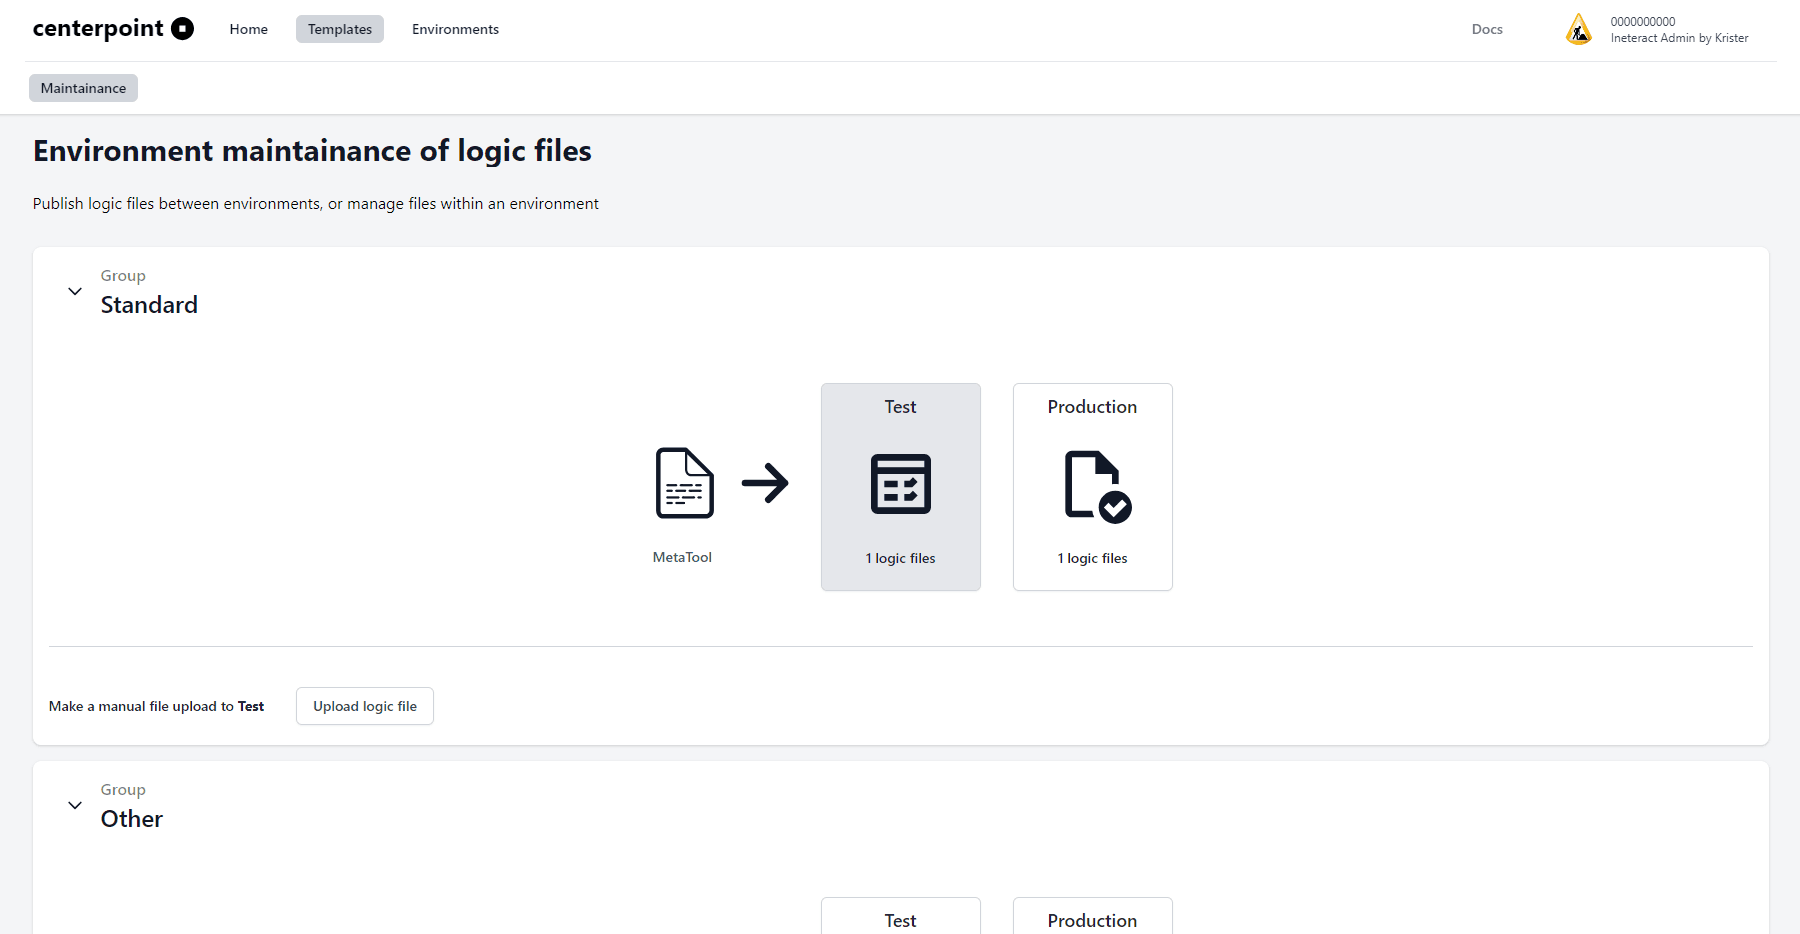
Deployment of template file
The first thing you might want to do is to deploy a logic file to an environment. There are two ways to do this:
- Use the “Upload logic file” button on the page
- Use Metatool and the “Publish to Centerpoint” button
Either way the logic file will be uploaded to the first environment in the flow (in this scenario it’s Test).
Upload logic file (button)
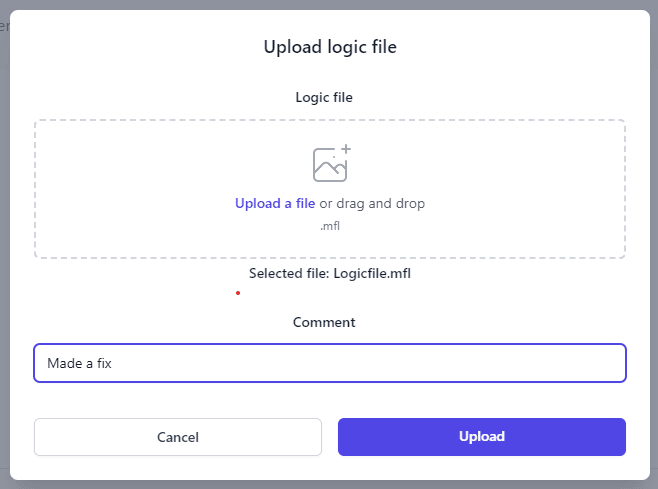
Upload a logic file by either clicking the “Upload a file” link or dragging the logic file to the upload area. You must write a comment to the deployment to create a deployment package. The comment and an automatically generated version number will follow the deployment package to all environments as the deployment package progresses.
Publish to Centerpoint (Metatool)

The other way to upload a logic file is to use Metatool and push the “Publish to Centerpoint” button. You will be guided to enter a comment to the deployment and an automatically generated version number will be generated in Pages Manager.
Deploy to the next environment
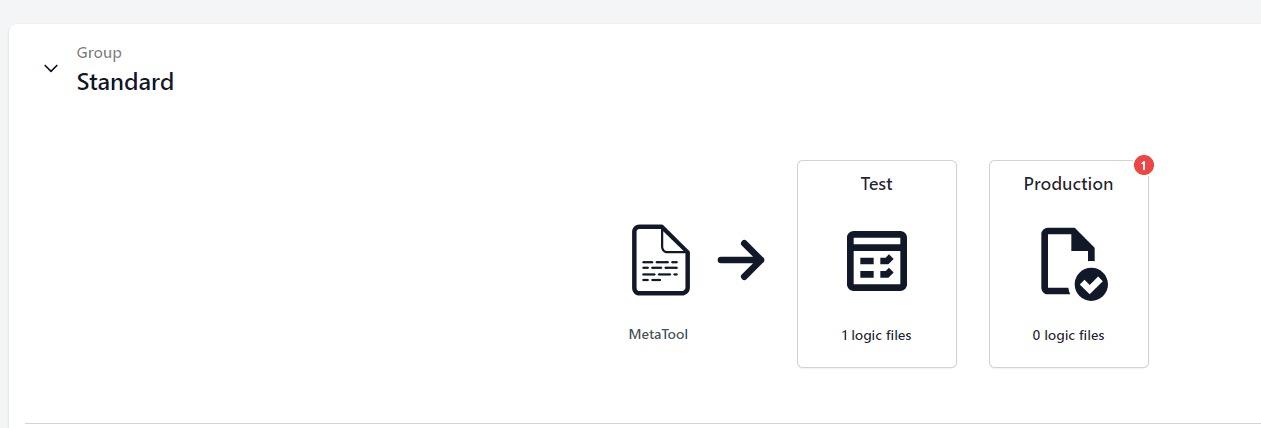
The logic file is automatically deployed to first environment in the list (Test environment in this case). In the GUI you will see that you have an update to the next environment (in this case Production environment).
Pushing the Production environment will open up a dialog showing you that you have an available update that can be deployed to Production. By pushing Update the logic file will be deployed to Production.
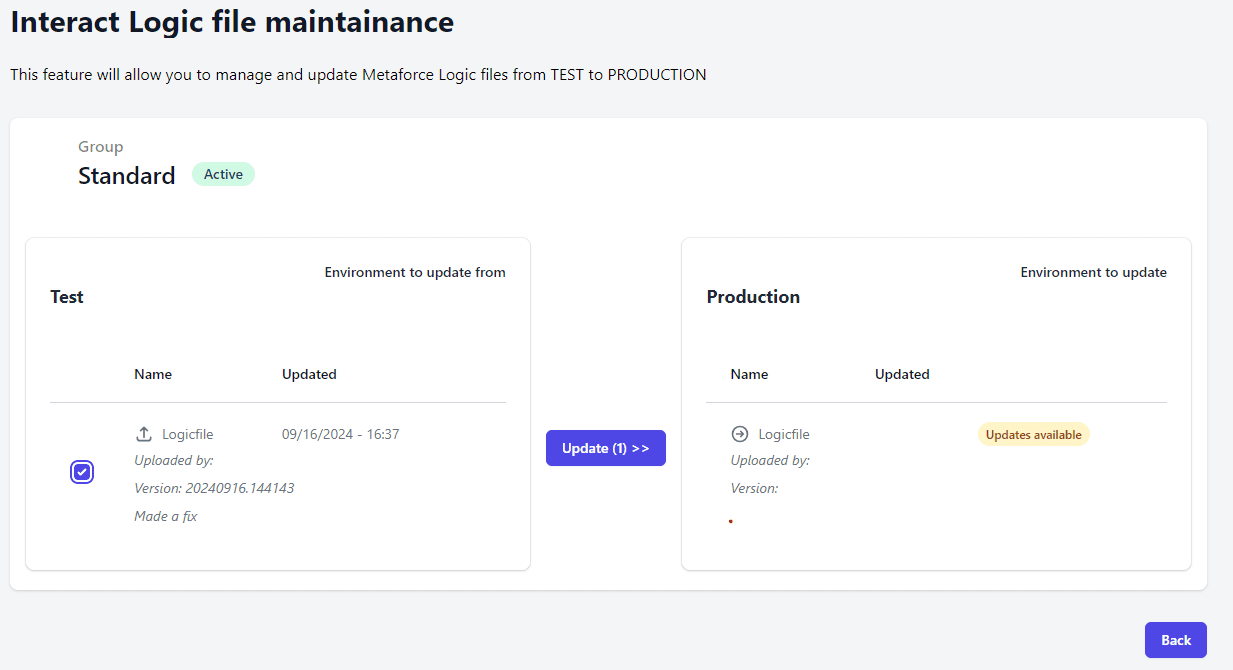
Depending on your configuration the number of environments may vary.
Deploy an updated logic file
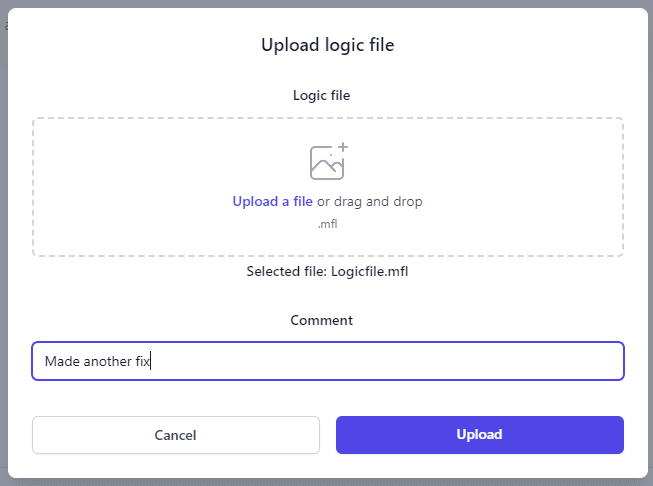
Deploying an updated logic file follows the same pattern as before. Write a comment and do an upload.
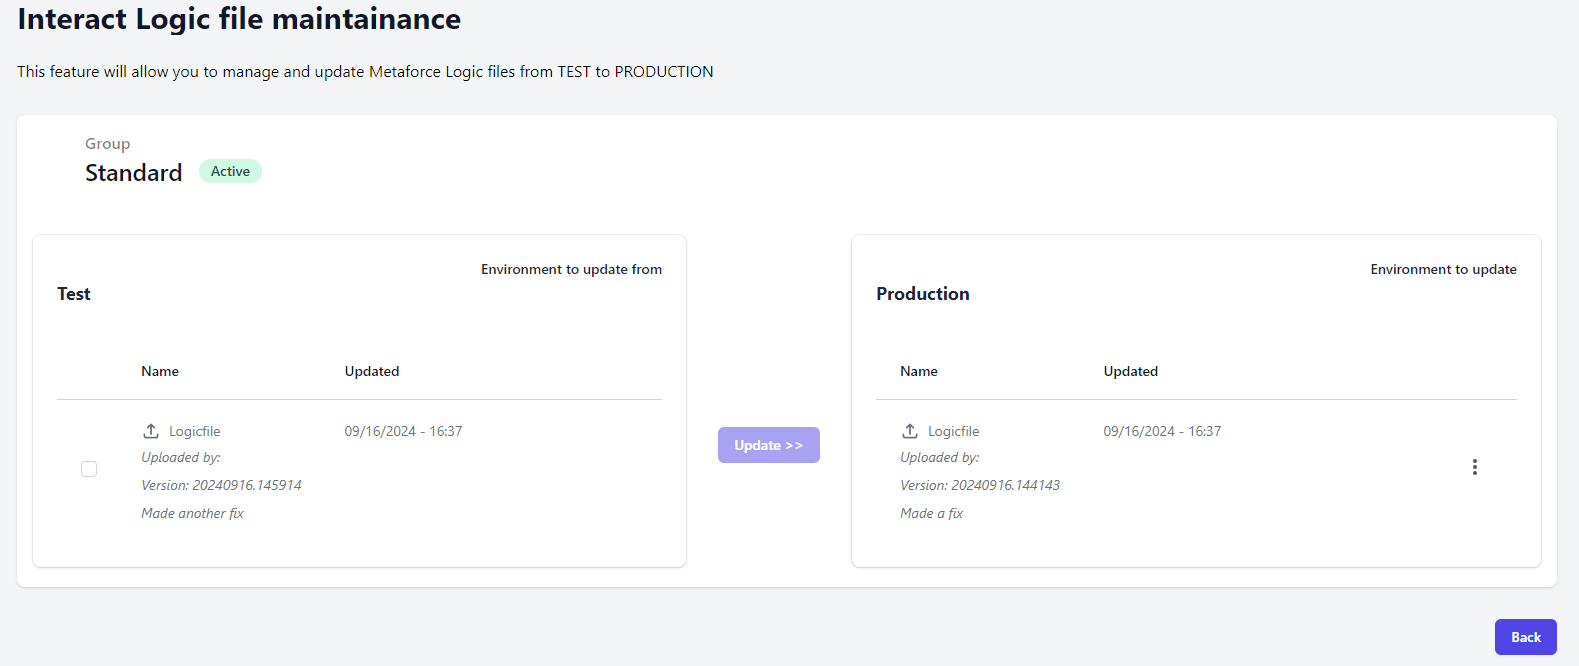
As you can see in the image the comment follows the deployment package. This is also true for the Version number. And all you have to do is to push the Update button to publish it to the next environment.
Rollback and other functions
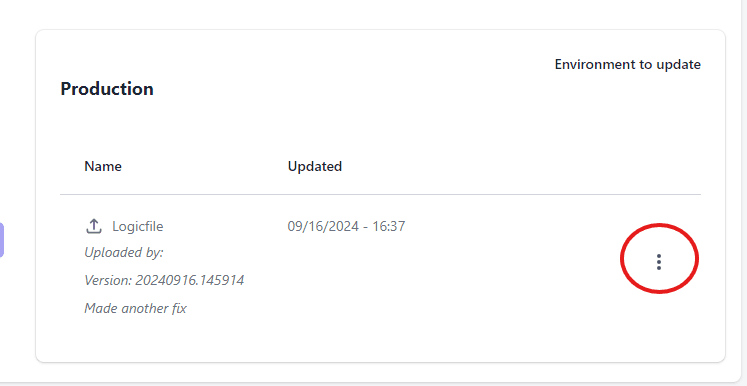
By pushing the context menu (…) on the environment the following menu will show:
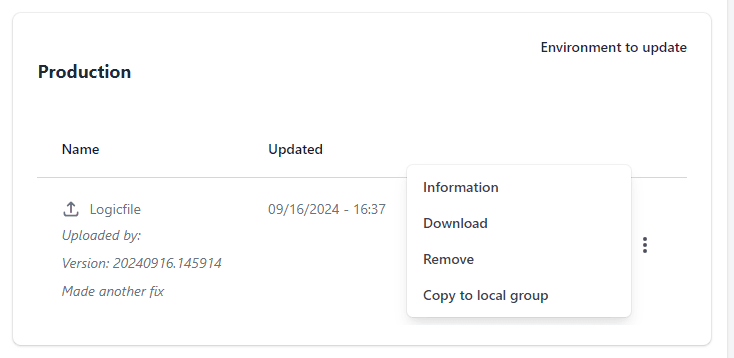
This gives you the following options:
- Information - Information about versions of the logic file with Rollback and Download to server information
- Download - Downloads the logic file to your local computer
- Remove - Deletes the logic file
- Copy to local group - If you have defined Environment Groups other than Standard (see Environments), you can deploy the logic file to another Environment Group and its first environment.
Information option

Pushing the Information option gives you information about previous versions of the logic file and downloads made.
Pushing the context menu (…) next to a logic file version will give you the following options:
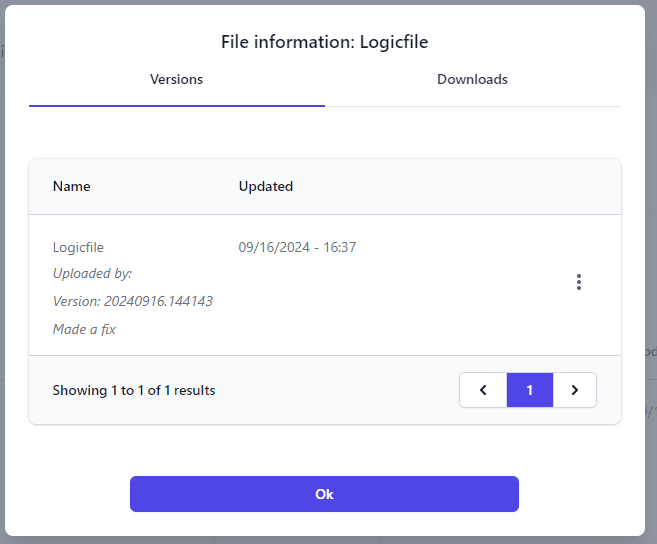
By selecting Rollback the logic file version will be redeployed to the selected environment.
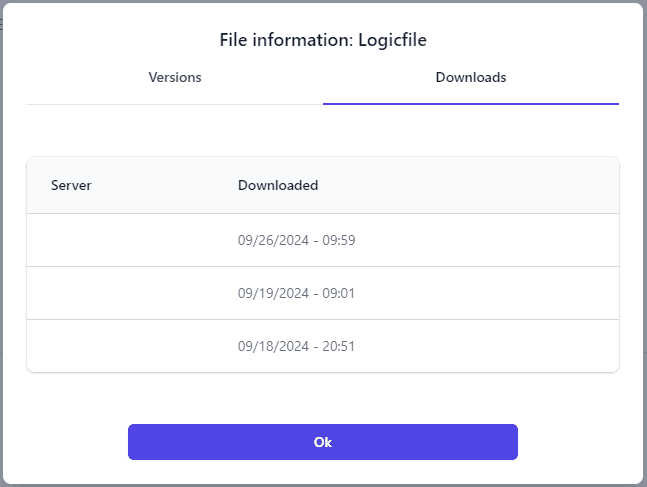
Selecting the Downloads tab you will see downloads made to server/s.
Environments
The Environments page lets you manage and configure your Pages environments.
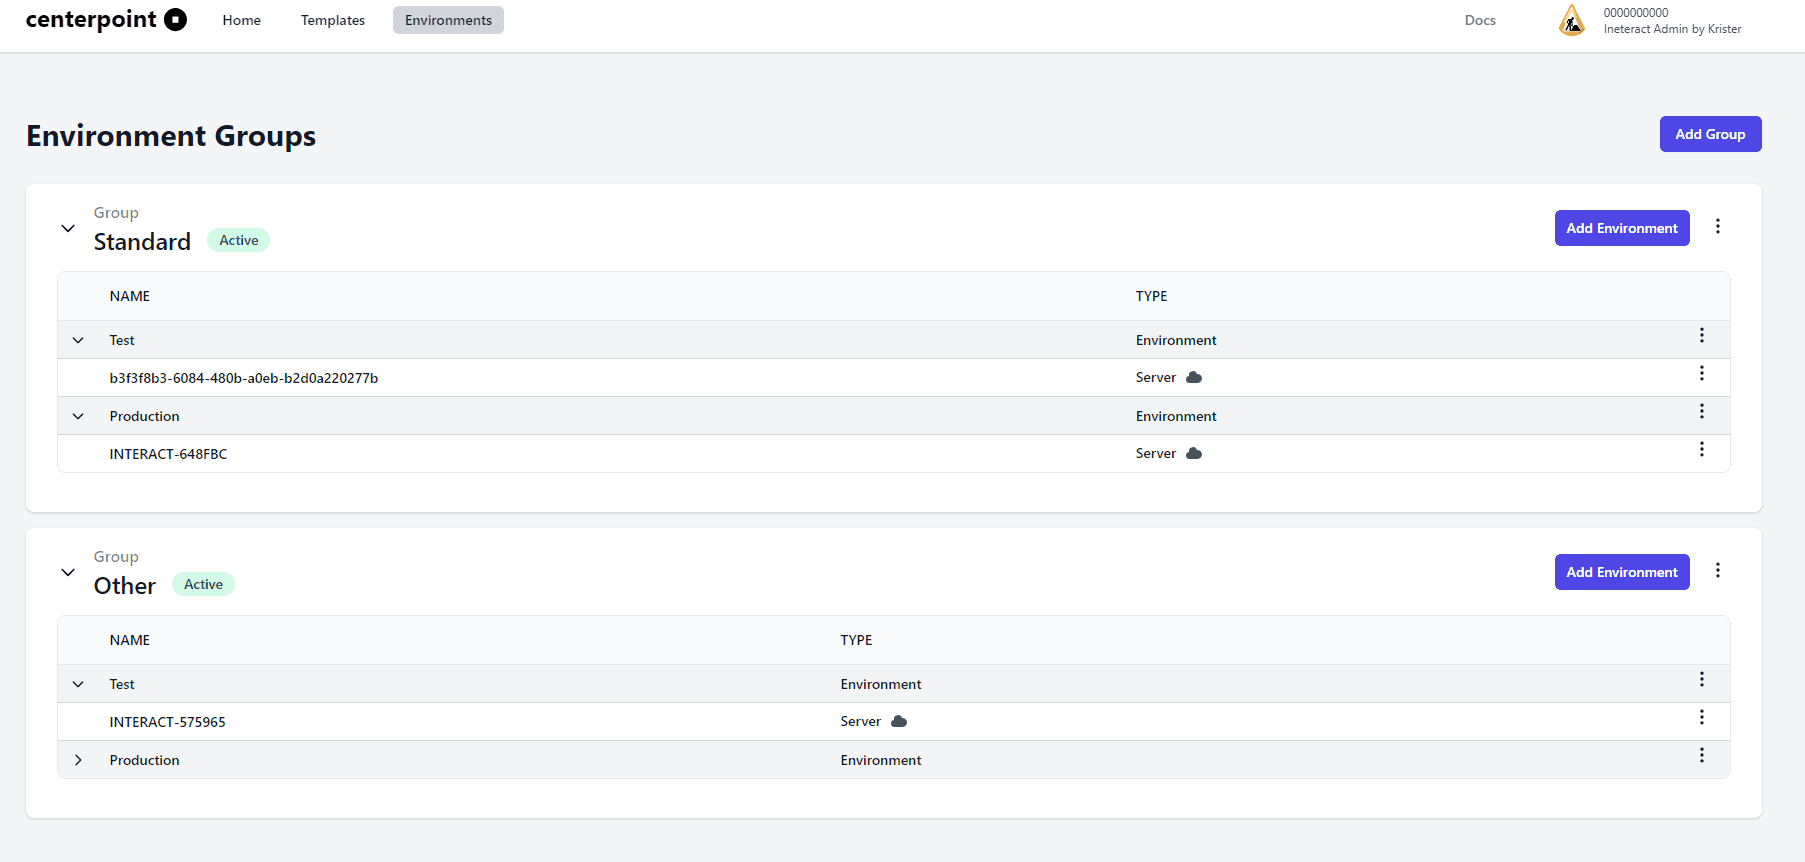
The environment configuration gives you an extremely flexible way to define your environment depending on your needs. You must yourself decide what is right for your scenario.
You have the following preset environments:
- Development
- Test
- Test1
- Test2
- Test3
- Test4
- Test5
- IntegrationTest
- AcceptanceTest
- Production
On top of that you can also work with Environment Groups that in turn can have all the preset environments described earlier. Naming the Environment Group is up to you which gives you great freedom to separate logical environments depending on your needs. There will however always be an environment named Standard.
Adding Environment
By pushing the Add Environment button you can either create a Kubernetes environment or point to VM based environment (Add manually).
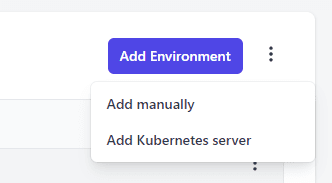
Adding Kubernetes Environment
Selecting to add a Kubernetes environment will bring up the following dialog. Here you select which environment to create.
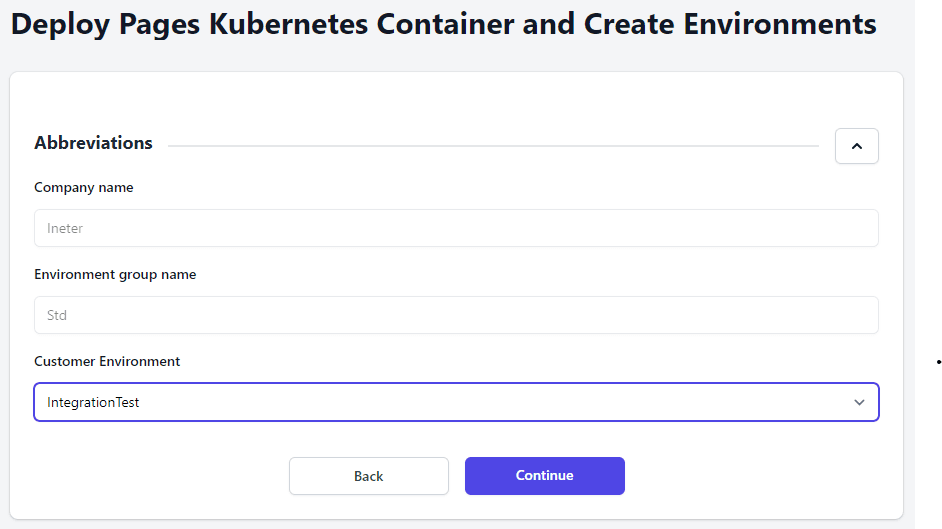
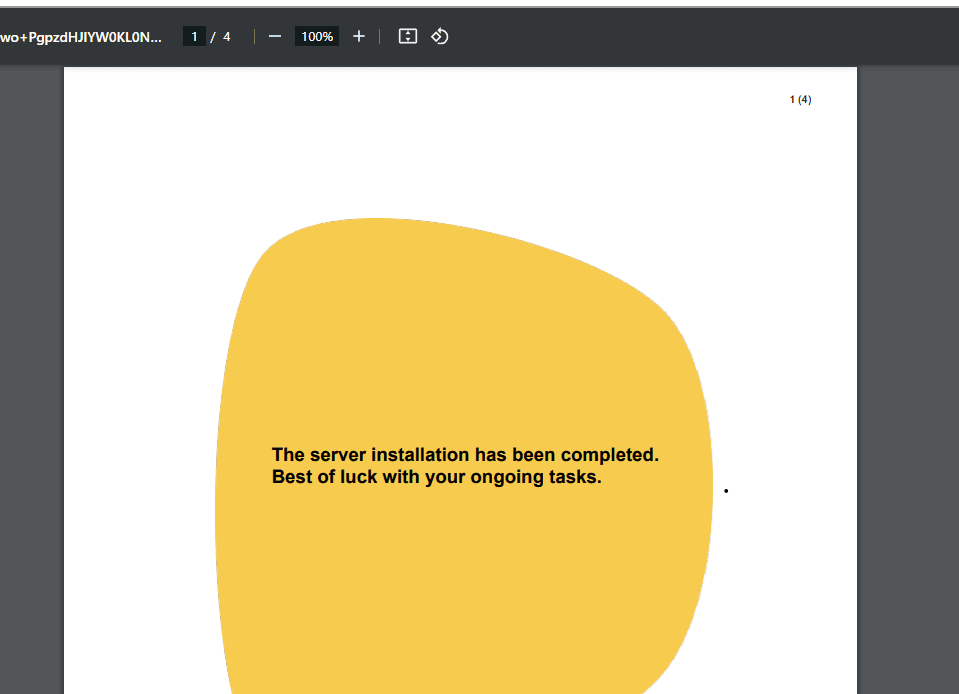
After you pushed continue you get the following dialog.

If all succedes you get the following happy message.

Push Create Test Page to verify that the environment works and Close to finish the process.
Editing Environment settings
After you succefully added an environment you most likely want to edit the environment settings. Do this by pushing the context function and select Edit.

This will bring up the Environment settings dialog.
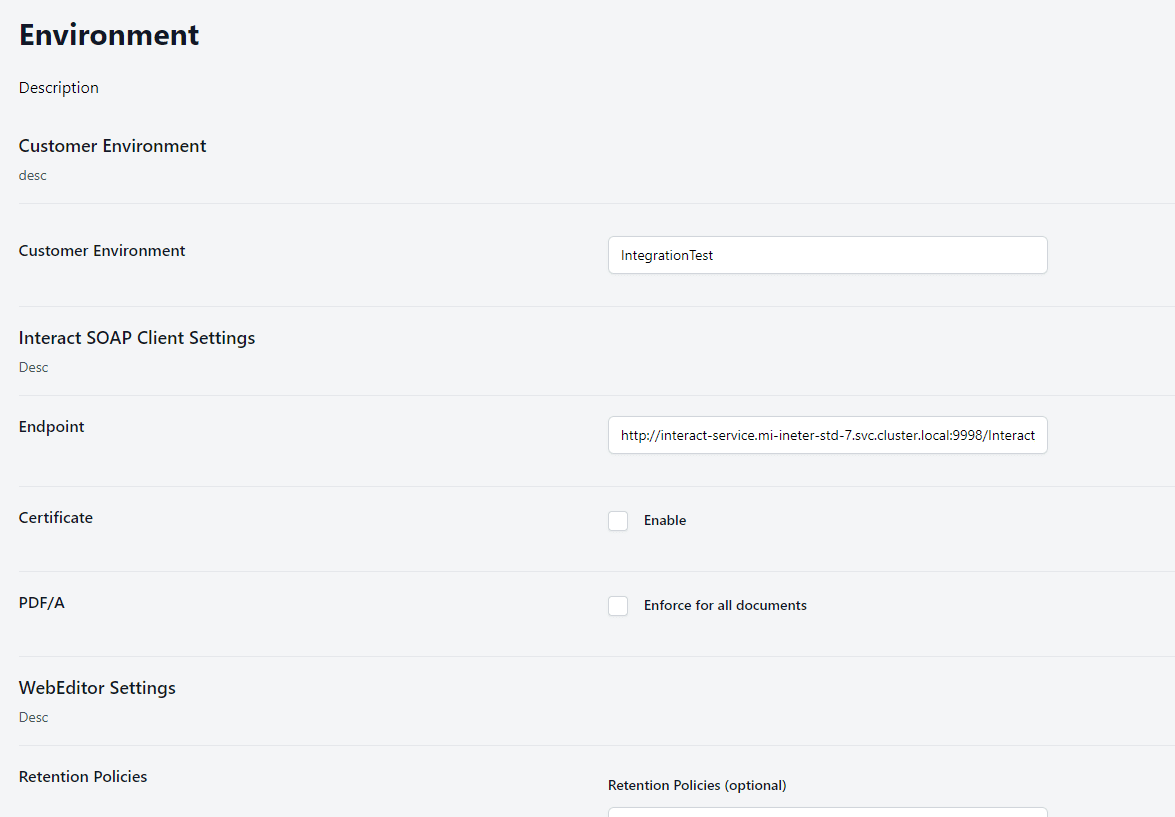
Environment settings
On this page you can change the following settings.
| Grouping | Setting | Description |
|---|---|---|
| Customer Environment | Customer Environment | Current environment (read only) |
| Interact SOAP Client Settings | Endpoint | The endpoint address of Interact SOAP services. Do not change this in a Kubernetes environment since it’s pointing at the backing container instance/s. |
| Certificate | Authentication certificate (only used for VM environment). If enabled you will have to upload a authentication certificate and its password. | |
| PDF/A | Turn on if you want the generated PDFs to be PDF/A compliant. | |
| WebEditor Settings | Retention Policies | Select another retention policy if you want to override the system default (5 days). To create your own Retention policy head over to Administration/Settings/Retention policies and define your own policy. Than come back and select it. |
| Preferred Language | Sets the preferred language on the Editor. | |
| Security | Set the Environment scope needed for API Clients to access the Environment. To create an API client go to Administration/Integration/API Clients. In the creation process you can choose the Environment scope of the client. | |
| Visibility | Show Text Library (license needed) and Preview Html (in Editor Preview with content enabled template). | |
| PDF Attachment | Enable the ability to include PDF files as attachments to Editor documents. If enabled you should configure Color Depth (Black and White/Color RGB), DPI and Duplex. | |
| Distribution | Enable Distribution in Editor. If enabled you should configure what distribution options should be available in Editor: Central distribution, Viewpoint/Archive, Local print and/or Email. These distribution options works in conjunction with the logic file and metadata defined there. | |
| MFDX Client Secret | Set the MFDX client secret if you use MFDX. Otherwise just set any value like “N/A” for instance. |
Adding VM Environment
Adding a VM environment will bring up the Environment settings directly. Besides all the settings described in that section you should set the Interact SOAP Client Settings Endpoint and Certificate specific for the backing SOAP services.
Distribution
The Distribution section in Pages Manager allows you to create, manage, and configure Distribution Lists and their Distribution Alternatives.
Distribution Lists are used by Pages logic files to determine how documents should be routed, delivered, or processed.
Distribution Lists Overview
The Distribution page displays all existing distribution lists, including:
- Name – The name of the distribution list
- Status – Active or Disabled
- Created Date – When the list was created
- Actions Menu – Edit, disable, delete, or manage alternatives
You can create new distribution lists or manage existing ones directly from this view.
Creating a New Distribution List
- Click New in the top-right corner.
- Enter a Distribution List Name.
- Click Create.
This creates an empty distribution list that you can then populate with alternatives.
Managing a Distribution List
Selecting a list opens the Manage Distribution view.
Here you can:
- Update the name of the distribution list
- View all existing distribution alternatives
- Create new alternatives
- Change the status (Active/Disabled)
- Modify or delete existing alternatives
Adding a Distribution Alternative
Distribution Alternatives represent the selectable or logical outputs inside a distribution list—each alternative typically maps to a distribution method, channel, or custom logic.
To create a new alternative:
-
Open a distribution list.
-
Click New under Distribution alternatives.
-
Fill in the following fields:
Field Description # (Code) A unique identifier. Name Human-readable name of the alternative. Description Optional description for documentation or internal use. -
Click Create.
The alternative is now added to the list and can be referenced in logic files.
Editing or Removing an Alternative
Each alternative includes a context menu (…) with the following options:
- Edit – Modify code, name, or description
- Disable/Enable – Temporarily deactivate an alternative
- Delete – Remove it completely from the list
Disabled alternatives remain in the list for reference but cannot be selected or used in logic execution.
Adding a Distribution Alternative
Distribution Alternatives represent the possible output choices within a list.
Logic files often reference these alternatives to determine the final routing of a document.
Steps to Add a New Alternative
-
Open the desired distribution list.
-
Click New under Distribution alternatives.
-
Complete the form:
Field Description # (Code) A required unique identifier. This value is used in logic files. Name A human-readable title displayed to users or administrators. Description Optional description for documentation or internal notes. -
Click Create.
The alternative is now part of the list and can be referenced in Pages logic.

Connecting a Distribution List to a Logic File
To use a Distribution List in a logic file, you must link it through the Templates section.
Steps to Connect
- Open Pages Manager.
- Go to the Templates tab.
- Select a Group, then choose the Environment (Development, Test, etc.) you want to configure.
- Inside the environment, locate the logic file you want to update.
- Click the three-dotted menu next to the logic file.
- Select Manage workflows.
- In the Manage Workflows view, click the three-dotted menu for the specific file you want to configure.
- Go to the Distribution section.
- Select your Distribution List from the picklist.
Once selected, the logic file will use this Distribution List.

Status Handling
Each distribution list and alternative can be either:
- Active – Available for use in logic files and Pages
- Disabled – Hidden from end-users but kept for documentation or rollback
Usage Notes
- Distribution lists and alternatives are referenced inside logic files created in Metatool.
- Codes (#) must be unique.
- Distribution lists are configured per environment.
CI/CD Deployment
The CI/CD deployment section describes how to automate publishing logic files to Pages Manager through a pipeline.
This enables fully automated deployments from your build server (e.g., Azure DevOps), ensuring consistent delivery of logic files across environments.
Production Kubernetes Environments
The following Kubernetes clusters are used for Pages production deployments:
-
Centerpoint primary production address
20.23.221.106 -
Centerpoint secondary production address
135.236.197.89
These endpoints are typically referenced when deploying backend components or when debugging cluster-level integrations. Some tenants may need to white list these addresses in order to access them from internal services.
Example: centerpoint-deploy.yaml
Below is a complete CI/CD pipeline example for publishing logic files to Pages Manager using Azure DevOps.
- Authenticates against the Metaforce Identity Provider
- Converts a logic file to Base64
- Publishes the file to Pages Manager using the LogicFilePublisher API
variables:
  fileName: "/tenant/logicfile.mfl" # Change this to each file in the artifact during deployment
  comment: "Published from Azure DevOps pipeline $(Build.BuildNumber)"
  userName: "$(Build.RequestedFor)"
  computerName: "Azure DevOps"
  templateEnvironmentId: ""***HIDDEN***"
  clientId: ""***HIDDEN***"
  clientSecret: "***HIDDEN***"
  identityUrl: "https://identity.metaforce.net"
  apiUrl: "https://api.interactadmin.metaforce.net"

# Define the jobs for the pipeline
jobs:
  - job: PublishFile
    displayName: "Publish Logic File to Pages Admin"
    steps:
        - task: PowerShell@2
          name: GetAccessToken
          displayName: 'Get Access Token'
          inputs:
            targetType: 'inline'
            script: |
              $headers = New-Object "System.Collections.Generic.Dictionary[[String],[String]]"
              $headers.Add("content-type", "application/x-www-form-urlencoded")

              $body = "grant_type=client_credentials&client_id=$(clientId)&client_secret=$(clientSecret)&audience=api&scope=api.external"

              $response = Invoke-RestMethod '$(identityUrl)/connect/token' -Method 'POST' -Headers $headers -Body $body
              Write-Host "##vso[task.setvariable variable=accessToken;isOutput=true]$($response.access_token)"

        - task: PowerShell@2
          name: GenerateLogicFile
          displayName: 'Generate Logic File'
          inputs:
            targetType: 'inline'
            script: |
              # HERE YOU WILL FETCH OR GENERATE THE LOGIC FILE
              # AND CONVERT IT TO BASE64

              $base64Content = [Convert]::ToBase64String([System.IO.File]::ReadAllBytes("$(Build.SourcesDirectory)/$(fileName)"))

              Write-Host "##vso[task.setvariable variable=base64Content;isOutput=true]$($base64Content)"

        - task: PowerShell@2
          displayName: 'Publish Logic File to Pages Admin'
          inputs:
            targetType: 'inline'
            script: |

              $requestBody = @{
                fileName = "$(fileName)"
                base64Content = "$(GenerateLogicFile.base64Content)"
                comment = "$(comment)"
                userName = "$(userName)"
                computerName = "$(computerName)"
                templateEnvironmentId = "$(templateEnvironmentId)"
              } | ConvertTo-Json

              $headers = @{
                "Content-Type" = "application/json"
                "Authorization" = "Bearer $(GetAccessToken.accessToken)"
              }

              $response = Invoke-RestMethod -Uri "$(apiUrl)/api/LogicFilePublisher/publish" -Method Post -Headers $headers -Body $requestBody
              Write-Host "Published file ID: $($response.id)"

              # Optional - log the full response for troubleshooting
              $response | ConvertTo-Json -Depth 5 | Write-Host