Actions
Smartforms
New
This function will extend a current Smartform or add a new one. You can, for instance, make an API look-up of the membership/customer status of an individual. Depending on the result, the current Smartform used by the individual can extend with new or altered questions/information, or the individual can be presented with a totally new Smartform. This is a great function for improving the customer experience and for improving data quality.
Send New
Depending on the data fed into a Smartform, a personalized contract or receipt can be generated and presented online to the Recipient. In the case of a contract, it can now be signed electronically by the Recipient. Once the contract is signed by the Recipient, a copy of the signed document is stored in the Archive, and a copy of the signed contract can simultaneously be sent to the Recipient.
Update Values
Select this option if you want to update values in an existing Smartform. This action is used in combination with the “Element Change” trigger, which allows the workflow to collect data from the Smartform, look up the collected data through a REST API, and then feed the new data back into the Smartform. A good example is to enter an organizational number into the Smartform and then let the workflow automatically fill in the company name and other available and relevant information.
Create PDF
Generates a PDF version of the Smartform based on its current data. This is particularly useful for creating formal documents such as invoices, reports, or summaries. The generated PDF can then be used for record-keeping, sharing with other systems, or delivering to the end user.
New Smartform PDF
With this action, you can create a new PDF document using data from a Smartform or other actions within the Workflow. The Smartform doesn’t need to be filled out manually by a user. You can automatically populate the PDF with content gathered or generated from previous steps in the Workflow.
This makes it easy to dynamically generate customized PDFs, such as contracts, receipts, or reports, without manual input.
REST API
The REST API Action can make both REST API calls and generate webhooks.
Example
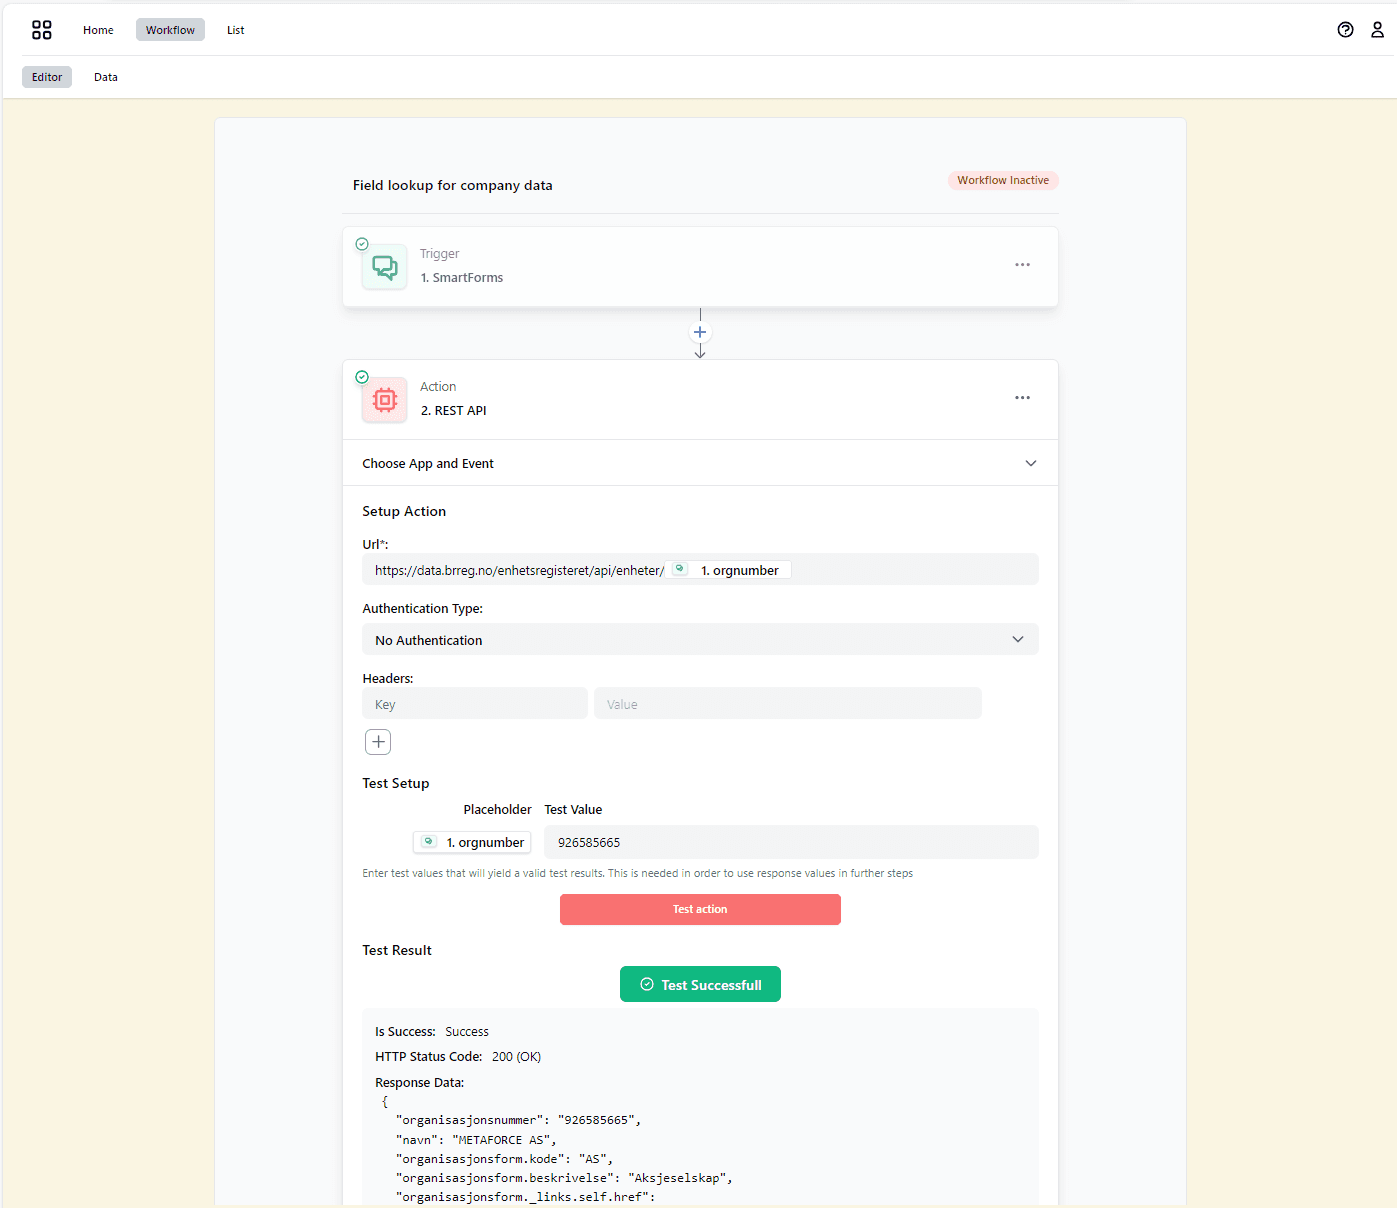
Below is an example that sends a value from a Smartform into a REST API and insert a new value from the REST API into a new Smartform.
Defines REST API
In this example, we define an external REST API that lookup official Norwegian company information from an organizational number. We are using the organizational number from an input field in a Smartform. (1. orgnumber)
Test the REST API
The workflow allows us to test that the REST API is working by inserting a value for the org number to test.
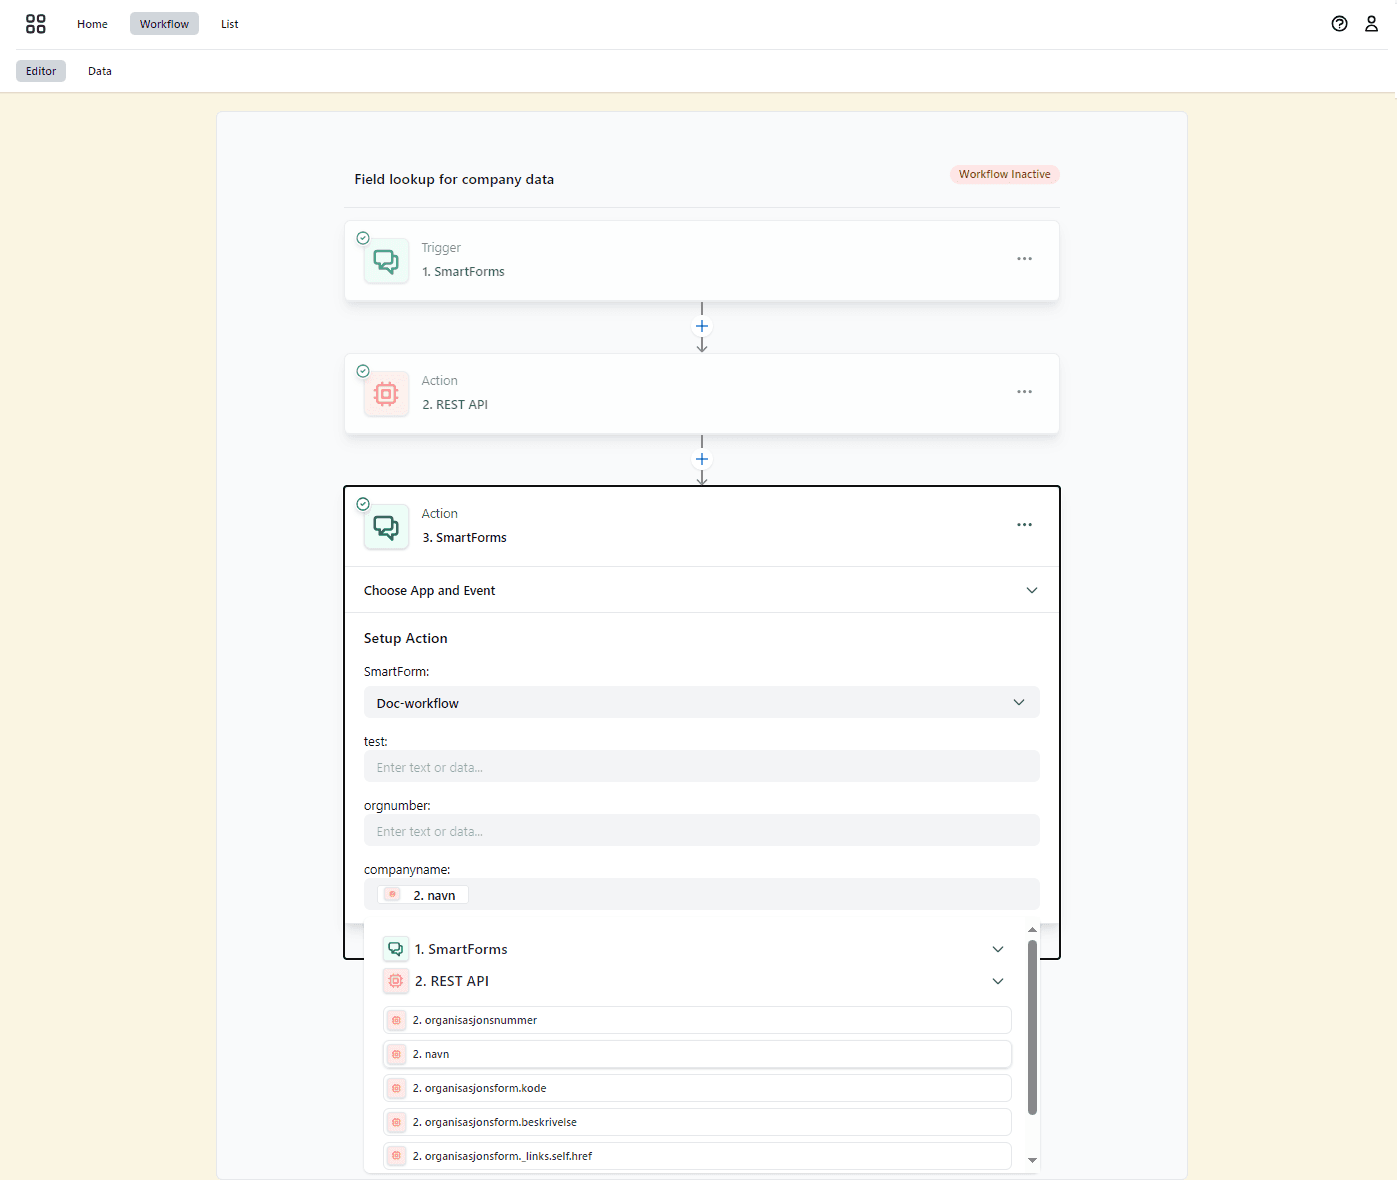
Insert into Smartform
Now you can insert the return values from the REST API into the Smartform.
Archive
The Archive Action allows you to store documents in a specific folder within the Archive Application, making file organization and retrieval simple. You can choose between three document types: Digitally Signed Files, which are secure, signed documents; Smartforms, which are files generated from Smartforms; or Default Document, which includes any other type of file.
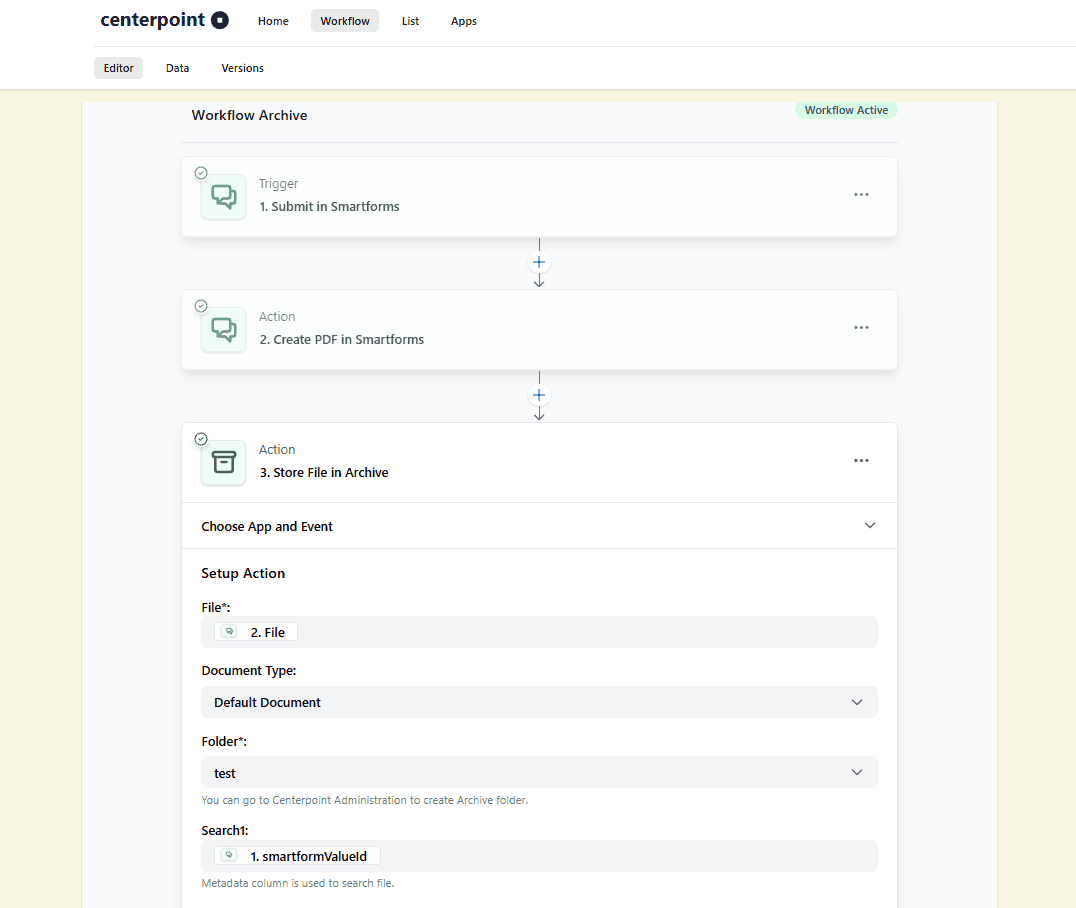
To configure the action, select the file you want to store, choose the appropriate document type, and specify the archive folder where it should be saved. You can also add metadata to the Search Field to make it easier to locate the file later.
Toolbox
The Toolbox Actions provide a set of utility functions that help process and transform data within a workflow. These actions are designed to handle both text and file formats, offering flexibility for various data processing needs.
Currently, the Toolbox includes actions for Base64 encoding and decoding, allowing you to:
- Convert Base64 to a PDF file object for further processing or storage.
- Convert regular text to Base64, enabling secure encoding for transmission or storage.
- Convert Base64 back to regular text, making encoded data readable again.
Tables
The Tables Action allows you to interact with custom tables that you’ve created in the “Tables” tab. This provides a powerful way to store, retrieve, and manipulate structured data within your workflows.
Adding a Tables Action
To add a Tables action to your workflow:
- Click the ➕ button in your workflow canvas
- Select Tables from the app selection dropdown
- Choose one of the tables you have created in the “Tables” tab
- Select an Action Event from the available options
Action Events
The Tables action provides several event options for working with your custom tables:
Insert Record
Allows you to add a single new record to your selected table. You must provide values for the columns you’ve defined in your table. This is useful for storing individual pieces of information collected during workflow execution.
Insert Multiple Records from CSV File
Enables bulk data insertion by uploading a CSV file containing multiple records. The CSV file should have headers matching your table’s column names. This is ideal for importing large datasets into your workflow.
Update Record
Modifies an existing record in your table based on specific criteria. You must specify which record to update (usually by ID or another unique identifier) and provide the new values for the columns you want to change.
Update Multiple Records
Updates multiple records that match your specified criteria. This is useful for batch-updating information across your dataset based on certain conditions.
Delete Record
Removes a single record from your table based on the criteria you specify. This helps maintain data cleanliness by removing outdated or irrelevant information.
Delete Multiple Records
Removes multiple records that match your specified criteria. This is useful for batch cleanup operations on your dataset.
Find Record
Retrieves a single record from your table based on search criteria. You can specify which columns to search and the values to match. The found record’s data can then be used in subsequent workflow steps.
Find Multiple Records as JSON Strings
Searches for and retrieves multiple records that match your criteria, returning them as JSON strings. This allows for complex data retrieval operations where you need to work with multiple matching records.
Get Record from JSON String
Converts a JSON string representation of a record back into a usable record object in your workflow. This is particularly useful when you need to parse JSON data received from external systems or previous steps.
Example: Looping Through Table Records
Sometimes you need to perform the same action for every row in a table.
For example, sending an email to each record, updating statuses, or generating forms.
This can be done by combining Find Multiple Records with a Loop.
Step 1: Add a Trigger
Start by adding any trigger that should start your workflow (e.g., webhook, form submission, or scheduled trigger).
Step 2: Find Multiple Records
- Add the action Tables → Find Multiple Records as JSON Strings.
- Select your table and apply filters if needed (or leave empty to fetch all records).
- This step will output an array of records.
Step 3: Add a Loop
- Add the action Loop → Loop on Array Values.
- In the loop configuration, set the Input Array to the records from Step 2.
(Example:2.records) - The loop will now run once for each row in the table.
Step 4: Add Actions Inside the Loop
Inside the loop, you can add any actions that should run for each record. For example:
- Send Email → use the row’s email column
- Update Record → change the status field for each row
- Send Form → generate a form for the current record
Each iteration of the loop gives you access to the row’s fields using placeholders like {{this.id}}, {{this.name}}, or {{this.email}}.
Example Workflow
- Trigger → Webhook received
- Find Multiple Records → Get all rows from “Contacts” table
- Loop on Array Values → Iterate through all records
- Send Email in Outlook (inside loop) → Send personalized email to each record
- Update Record (inside loop) → Mark record as “processed”
Digipost
The Digipost Actions allow you to interact with Digipost, a secure digital mailbox service. These actions enable workflows to verify user accounts and send messages securely.
To use these actions, you must have an active Digipost connection configured in your workflow.
Find user
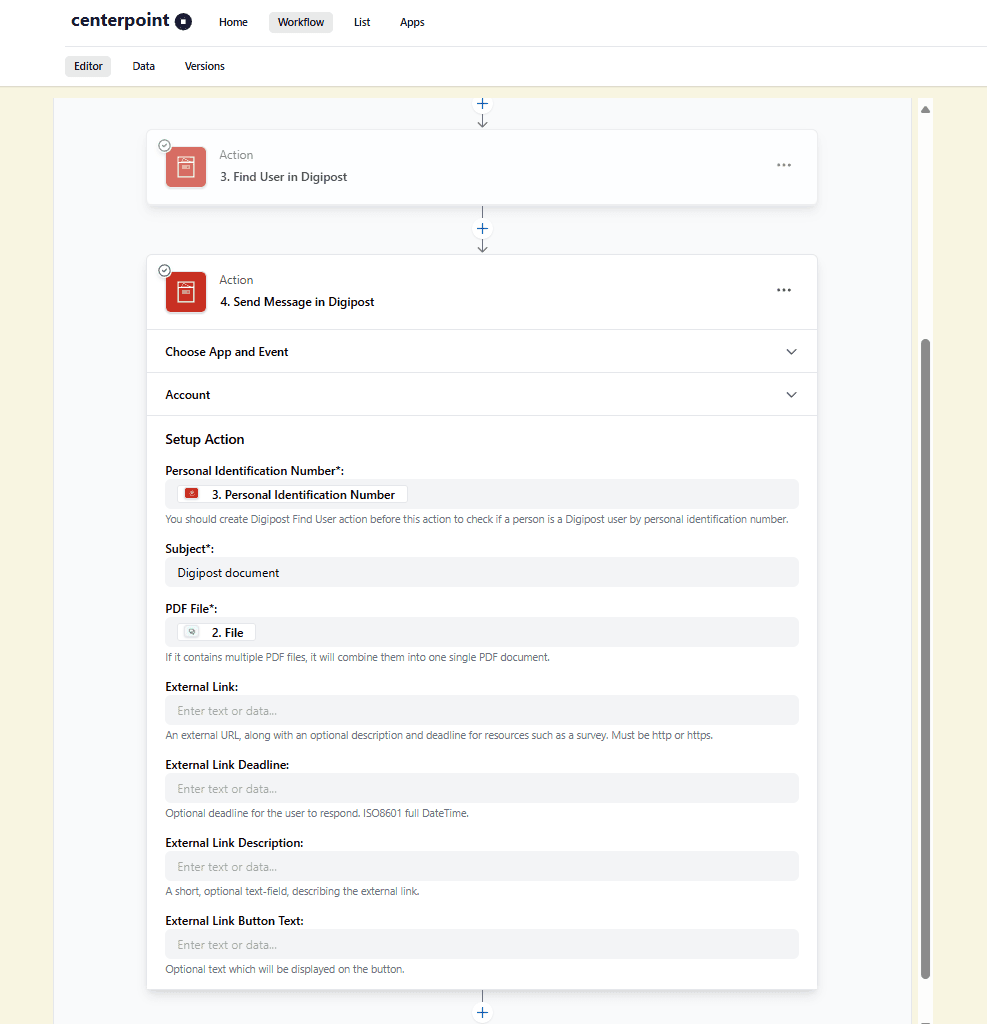
The Find User action checks if a recipient has a Digipost account based on their Personal Identification Number. Before sending a message, this action should be used to confirm the recipient is a registered Digipost user.
Send Message in Digipost
The Send Message action allows you to securely send PDF documents to a recipient’s Digipost mailbox. To use this action, you must provide the recipient’s Personal Identification Number, a subject line, and a PDF file. If multiple PDFs are included, they will be merged into a single document.
Editor
The Editor Actions provide functionality for creating, editing, and generating documents in different formats. These actions allow workflows to handle structured documents efficiently using XML-based data input.
Edit document
Generates a DXML document based on a template and data, and opens the document in the Editor for editing.
Create DXML
Generates a DXML (Dynamic XML) document based on a template and structured data.
Create PDF
Converts structured XML data into a formatted PDF document using a template.
Microsoft Outlook
The Microsoft Outlook connector sends mail via an Outlook account. In order for this to work the Entra ID administrator must grant the application (connector) consent. See the official Microsoft documentation: Grant tenant-wide admin consent to an application.
As you can see in the image below the Outlook connector needs consent for:
- Send mail as you
- Send mail on behalf of others or yourself
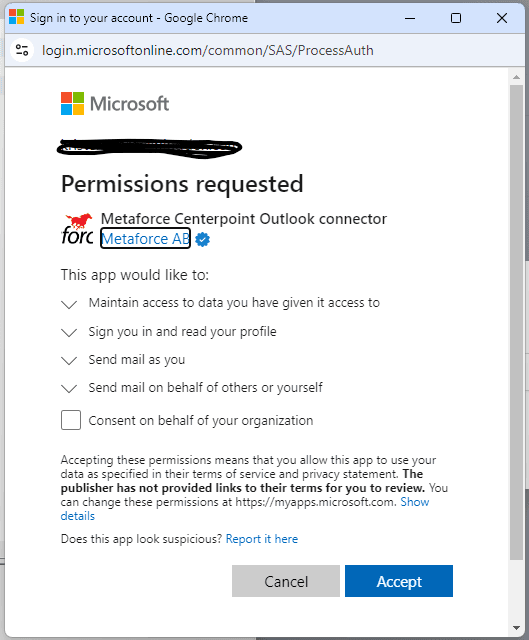
Once the consent is given you can start to send mail.
Kivra
Kivra is a secure digital mailbox service that allows users to receive, store, and manage important documents, invoices, and letters digitally. By integrating Kivra into your workflow, you can automate document distribution, invoice processing, and secure communication with recipients who use Kivra.
1. Set Up Kivra Integration
Before you can use Kivra in Workflow, you must first create an integration within Kivra. Follow these steps:
Go to Kivra Developer Portal
Visit the official Kivra documentation for developers:
Kivra Developer Documentation
Create an Integration in Kivra
- Sign in to your Kivra business account.
- Navigate to the Developer section.
- Register a new integration and obtain your Tenant Key and other required credentials.
Once you have successfully created an integration in Kivra, proceed to set up the connection in Workflow.
2. Connecting Kivra to Workflow
Before using Kivra actions in Workflow, you need to set up a connection.
Steps to Connect Kivra
- Go to Workflow Apps: Open Workflow and navigate to the Apps section.
- Add a New Connection: Click “New Connection” to start the setup process.
- Select Kivra: From the dropdown menu, choose Kivra as your integration option.
- Configure the Connection:
- Select Environment: Choose the appropriate environment (e.g., Production or Test) to match your requirements.
- Enter Tenant Key: Provide the unique Tenant Key assigned to your Kivra account.
- Save and Activate: Click Save to establish the connection. Once saved, the connection will be available for use in Workflow.
After successfully setting up the connection, you can start using Kivra actions within your workflows.
Kivra actions
Find user
The Find User action allows you to check if a specific recipient is registered with Kivra. This is useful for ensuring that the intended recipient can receive digital documents, invoices, or letters through Kivra.
Create document
The Create Document action allows you to generate a document by uploading a PDF file. If multiple PDFs are uploaded, they will be combined into a single document. Additionally, you can provide an HTML Responsive Content version of the document, which formats the document for better readability on different devices. This action does not send the document; it simply prepares it for further processing in the workflow.
Create invoice payment option
The Create Invoice Payment Option action allows you to generate an invoice payment request with different payment options for the recipient. Users can specify a due date (formatted in ISO 8601 YYYY-MM-DD), an amount, and a reference type. There are two available reference types:
- SE_OCR: Used for OCR-compatible reference numbers.
- TENANT_REF: A custom reference of your choice that must be consistent with the provided reference value.
Create invoice payment flexible option
The Create Invoice Payment Flexible Option action provides a more flexible way to generate an invoice payment request. This action ensures that recipients have controlled flexibility when making payments through Kivra. Users can specify a due date (formatted in ISO 8601 YYYY-MM-DD), a reference type (SE_OCR or TENANT_REF), and a reference value. This action allows users to define:
- Minimum Allowed Amount: The lowest amount the recipient can pay (default is 1 SEK if not set).
- Suggested Minimum Amount: A recommended lower payment limit, but the recipient can still proceed with a lower amount.
- Suggested Maximum Amount: A recommended upper payment limit, which can be exceeded if necessary.
- Maximum Allowed Amount: The highest amount allowed, with a hard limit of 150,000 SEK due to payment provider restrictions.
This action ensures that recipients have controlled flexibility when making payments through Kivra.
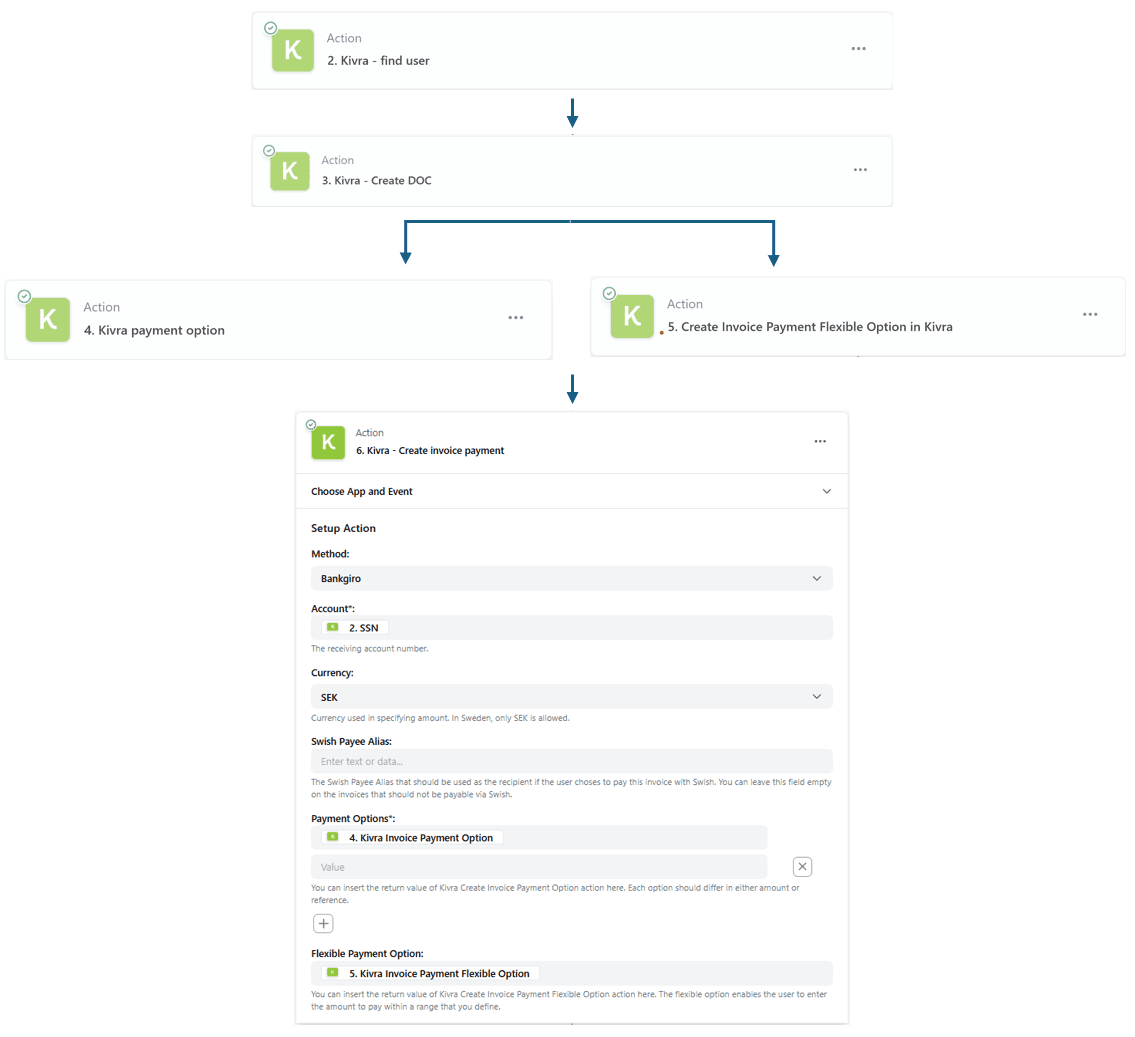
Create invoice payment
The Create Invoice Payment action allows you to process invoice payments through Kivra. Users can specify the payment method (e.g., Bankgiro), enter the receiving account number, and define the currency (only SEK is supported). If payments via Swish are enabled, a Swish Payee Alias can be included. This action also requires linking one or more payment options from a previously created invoice payment option and optionally defining a flexible payment option, allowing the recipient to enter an amount within a predefined range.
Send letter
The Send Letter action allows you to digitally send letters to recipients via Kivra. Users must specify a recipient identifier (e.g., email) and ensure that the recipient is registered in Kivra. The subject and type of the letter (e.g., “letter”) must be defined. Optionally, users can attach the Compaign tag which is created in the Kivra Compaigns interface. The letter must include a document, which can be selected from a previously created document in the workflow. This ensures that official communications are securely delivered within Kivra.
Send invoice
The Send Invoice action enables you to send invoices directly to recipients in Kivra. Users must specify a recipient identifier (e.g., VAT number) to match the recipient with Kivra’s available records. The subject and type (e.g., “invoice”) must be defined. The invoice must include a document, which is selected from a previously created document, and a payment reference, linking it to an invoice payment created earlier in the workflow. This ensures that invoices are sent securely and can be processed efficiently within Kivra.
Condition
To include conditions in a workflow, you add one or several logical steps. The conditions are found to the right in the added form.
Only continue if the condition is met
This option stops a workflow at the current step or allows it to continue. An example is when you like to register a new member. If a person already is a member, you can stop the workflow, and if the person is not a member, you move it past the filter to register the person as a new member.
You register the conditions you want to select from data fields available in the workflow and add logical rules, like = > != etc., to
decide if the workflow should continue to the next step or not.
Create new path if condition is met
This option enables the workflow to run different paths based on data condition rules. An example can be that a workflow will run into two different paths based on if personal information shows that a person is a member/customer or not. In this example, you can run into two different paths to adjust the communication.
Split into multiple paths for every condition met
This option allows the workflow to add one or several new paths based on one or several conditions met. A good example is when a Recipient (organization or individual) wants to change from one insurance broker to a new one. The new insurance broker will need general data about the Recipient (KYC) and a power of attorney to represent the Recipient with all the existing and potentially new insurance suppliers. The new broker sends a Smartform to the Recipient with all relevant questions for adding a new customer and a list of insurance suppliers that can be selected by the Recipient using a check-box list. By filling in KYC data, selecting which insurance companies the Recipient has and then electronically signing the Smartform, the workflow will send the KYC data to the relevant business systems at the new broker, and at the same time generate and automatically send a power of attorneys to all existing insurers in the format that each of the insurers wants.